TGMC:Marine Quickstart Guide: различия между версиями
imported>AIIA |
Нет описания правки Метка: визуальный редактор отключён |
||
| Строка 1: | Строка 1: | ||
{{TGMC}} | {{TGMC}} | ||
<div style="margin-left: auto; margin-right: auto;"> | <div style="margin-left: auto; margin-right: auto;"> | ||
= | = Добро пожаловать!= | ||
Данное руководство должно помочь вам хотя бы выглядеть опытным морпехом. Но, как и на всех серверах, вам важно соблюдать [[TGMC:Rules|правила]]. Сервер позиционируется как Медиум-РП, поэтому вам нужно хотя бы пытаться исключать мемы из общения и вести себя, подобая своему рангу. Следуйте [[TGMC:Military Law|военному закону]], иначе вы можете быть арестованы, убиты или забанены. | |||
''' | '''Ваша приоритетная задача - заботиться о себе, о других морпехах, убивать ксеноморфов и уничтожить их улей.''' Экипируйся, вооружайся, лечись и превращай жизнь ксеноморфов в ад. | ||
== | ==Вы проснулись от криосна== | ||
[[Файл:DMCA_Assignement.png|справа|500x500пкс]]После того как вы завершили настройку своего персонажа, вы проснулись от криосна. Вы полуголый, голодный и, возможно, потерянный морпех. Но не стоит унывать, инженеры грамотно спроектировали корабль. | |||
Если вы не выбрали предпочитаемый отряд в '''Job Preferences''', то вас распределят в случайный. Посмотрите в свой чат, чтобы определить какой именно. Не стоит грустить, если вы не попали в свой любимый отряд, потому что стандартный режим игры предполагает не битву между друг другом, а битву против общего врага - ксеноморфов. '''Не стреляйте по морпехам!'''[[Файл:DMCA_Canteen.png|справа]] | |||
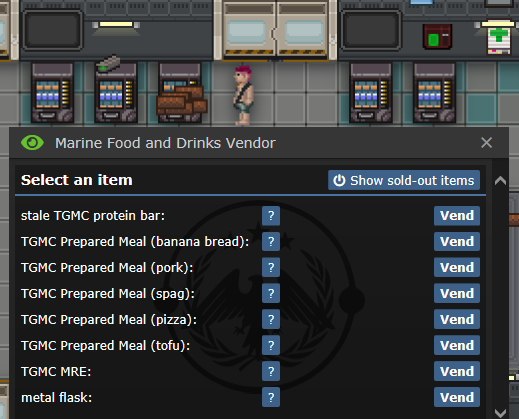
Почти на всех кораблях кафетерии расположены рядом с капсулами криосна, на некоторых вас до туда проведут цветные линии на полу. Очень важно сразу принять пищу, так как на поле боя весь ваш разум будет занят генерацией идей для выживания, а ваш рюкзак - всевозможными полезными предметами, которые вряд ли будут питательны. Подойдите к ближайшему вендору и закажите несколько порций еды. Не стоит есть с пола, еда рассчитана на всех морпехов. ''Среднестатистическому морпеху хватает двух протеиновых батончиков на всю свою жизнь!'' | |||
Определить уровень голода поможет данная иконка в правой части экрана: [[File:DMCA_Hunger.png]] Она принимает разные цвета в зависимости от заполненности желудка: оранжевый (Истощен), желтый (Голоден), отсутствует (Сыт), серый (Переевший). | |||
[[ | Так как разные корабли спроектированы по-разному, то для навигации вам поможет кнопка '''Webmap'''.<br> | ||
[[file:TGMC_webmapguide.png|900px]] | |||
==Получение снаряжения == | |||
[[File: | Итак, вы наполнили свой желудок и готовы к бою, но вот незадача, у вас нет одежды, брони и оружия. Для начальной подготовки пройдите к '''GHMME Automated Closet''' [[File:TGMC GHMME Automated Closet.png|64px]] и откройте его интерфейс, кликнув по нему. | ||
===Ваша броня=== | |||
Для начала игры рекомендуется выбрать: | |||
* '''Essential Jaeger Kit.''' (Вы получите униформу, перчатки, ботинки, наушник, паек, краску и боевой экзоскелет) | |||
*'''Light/Medium/Heavy Jaeger kit.''' (Вы получите шлем, который надевается на голову и компоненты брони экзоскелета, а именно: нательные пластины, плечевые и коленные. Вы можете покрасить данные компоненты используя ЛКМ (иногда ПКМ) с краской (Green Facepaint) в руке. Выбрав следующие по списку пункты, вы получите нательный модуль для экзоскелета и модуль для шлема. После покраски и установки модулей можно прикреплять компоненты к выданному ранее боевому экзоскелету) | |||
*'''Satchel.''' (Менее вместительный чем Backpack, но не имеет задержки для взяти предмета из сумки) | |||
*'''Tactical black vest.''' | |||
*'''Standard ammo belt.''' | |||
*'''Firstaid pouch.''' (В будущем рекомендуется заменить на Medkit Pouch) | |||
*'''Flare pouch.''' (Можно будет заменить на любой другой, но флаеров часто не хватает) | |||
*'''General Purpose Storage Module.''' (Может вмещать две коробки с используемыми патронами) | |||
*'''Mark 1 Tyr extra armor set.''' | |||
*'''Tactical gas mask.''' | |||
[[File:TGMC_Marine_Vendor_UI.png|400px]][[File:DMCA_Equipped.png|400px]] | |||
=== | === Ваше оружие=== | ||
<blockquote> | <blockquote> | ||
<b><big> | <b><big>Заметьте:</big> Вы можете выбрать любое оружие, которое вам понравится и экспериментировать с обвесами для него. | ||
<br> | <br>Экспериментируйте и получайте удовольствие от игры. | ||
<br> | <br>Вы никогда не будете обузой для своей команды.</b> | ||
</blockquote> | </blockquote> | ||
[[File:DMCA_Weapons_Vendor.png|400px]][[File:DMCA_Equipped2.png|400px]] | [[File:DMCA_Weapons_Vendor.png|400px]][[File:DMCA_Equipped2.png|400px]] | ||
Рядом с вендором со снаряжением находится вендор с оружием '''Automated Weapons Rack''' [[file:TGMC_Automated_Weapon_Rack.png|64px]]. | |||
* Выберите одну T-12 Assault rifle [[file:T12AR.png|64px]] и возьмите её. | |||
* Выберите шесть T-12 magazines. [[File:T12AR_mag.png|64px]] | |||
* Возьмите один магазин в одну руку, а затем кликните им по винтовке в другой руке, чтобы зарядить магазин в неё. | |||
* В левом верхнем углу, когда у вас винтовка в руке, появится иконка пули, регулирующая режим стрельбы (Firemode). | |||
* После этого нажмите '''E''' или кликните с винтовкой в активной руке на ваш Suit слот. Возьмите магазины и поместите их в ваш разгрузочный жилет [[file:TGMC_Ammo_Rig.png|64px]] | |||
Теперь пришло время добавить обвесов на вашу винтовку. | |||
=== | ===Ваши обвесы=== | ||
<br> | <br> Чтобы посмотреть какие обвесы вы можете повесить на оружие, осмотрите его (Shift+ЛКМ) а после этого нажмите на кнопку '''relevant information''' в чате. В появившемся окне вы сможете обнаружить полный список возможных обвесов, а также статистику вашего оружия Некоторые обвесы не могут быть удалены, например T12 имеет неснимаемый приклад. | ||
<br> | <br>Прикрепление обвесов схоже с перезарядкой: В одной руке винтовка, в другой обвес и нажать обвесом на винтовку. | ||
=== Getting other Gears === | ===Getting other Gears=== | ||
After you're done, you might also want to grab a few flare packs and put them into your satchel. Flares serve an important role, giving you intel and may prevent you from walking into an ambush. Always flare a room first before pushing into it with your squad. You may notice a requisitions area, which is where you can get more advanced gear such as grenades. Since your basic setup is complete for now, you can ignore this area. | After you're done, you might also want to grab a few flare packs and put them into your satchel. Flares serve an important role, giving you intel and may prevent you from walking into an ambush. Always flare a room first before pushing into it with your squad. You may notice a requisitions area, which is where you can get more advanced gear such as grenades. Since your basic setup is complete for now, you can ignore this area. | ||
== Heading to Planetside == | == Heading to Planetside== | ||
After this, you are almost ready to rumble! Briefing is nearly always held over radio, as it is more time efficient than making people stand around. They are usually announced around 12:05-12:10, but should you miss them ask your squadmates (;) or on the general channerl (:h). | After this, you are almost ready to rumble! Briefing is nearly always held over radio, as it is more time efficient than making people stand around. They are usually announced around 12:05-12:10, but should you miss them ask your squadmates (;) or on the general channerl (:h). | ||
| Строка 97: | Строка 78: | ||
[[File:DMCA_Dropship.png|400px]] | [[File:DMCA_Dropship.png|400px]] | ||
= Battle, or TIME TO UNGA= | =Battle, or TIME TO UNGA= | ||
When there's an enemy nearby or you hear shots or other signs of potential hostile activity, take your rifle out of your armor slot by either clicking on the sprite or pressing '''E'''. When you want to shoot, always make sure to wield it by hitting '''Z''' with it in your active hand, then click somewhere to shoot. Never fire a weapon one-handed as it causes a lot of recoil; you can tell when the screen shakes a lot. Always stay near your allies so that they may help you out when you get in a pinch. | When there's an enemy nearby or you hear shots or other signs of potential hostile activity, take your rifle out of your armor slot by either clicking on the sprite or pressing '''E'''. When you want to shoot, always make sure to wield it by hitting '''Z''' with it in your active hand, then click somewhere to shoot. Never fire a weapon one-handed as it causes a lot of recoil; you can tell when the screen shakes a lot. Always stay near your allies so that they may help you out when you get in a pinch. | ||
| Строка 103: | Строка 84: | ||
If your rifle is out of ammo and you have an ammo belt full of fresh magazine | If your rifle is out of ammo and you have an ammo belt full of fresh magazine | ||
; Step 1 : press '''Z''' to unwield your rifle since you need an empty hand to get your new magazine | ;Step 1:press '''Z''' to unwield your rifle since you need an empty hand to get your new magazine | ||
; Step 2 : press '''X''' to change the active hand from your rifle hand to your empty hand | ; Step 2:press '''X''' to change the active hand from your rifle hand to your empty hand | ||
; Step 3 : press '''E''' to instantly get your new magazine from your ammo belt | ;Step 3:press '''E''' to instantly get your new magazine from your ammo belt | ||
; Step 4 : click the sprite of your rifle with the magazine on your hand | ; Step 4:click the sprite of your rifle with the magazine on your hand | ||
; Step 5 : press '''X''' to change the active hand from your empty hand to your rifle hand | ; Step 5:press '''X''' to change the active hand from your empty hand to your rifle hand | ||
; Step 6 : press '''Z''' to wield your rifle. | ; Step 6: press '''Z''' to wield your rifle. | ||
{{Speech | {{Speech | ||
| Строка 117: | Строка 98: | ||
==Firing lanes== | |||
== Firing lanes == | |||
It is very important to move in one line with your fellow marines and fire in a way where you won't hit your squadmates. It is better to miss a shot than to hit a friendly marine. Medics are a rarity, always let the people in the front shoot, don't try and move through them. Staying on grab intent [[File:Intent_Grab.png]](the yellow intent, hit 3 to use it) during a firefight is vital otherwise if you walk into someone who is also shooting with help intent [[File:Intent_Help.png]], meaning that both of you are in help intent, you will swap positions and get hit. If you do need to shoot through marines, you don't have to be a [[TGMC:Squad Smartgunner|Smartgunner]] to do so! | It is very important to move in one line with your fellow marines and fire in a way where you won't hit your squadmates. It is better to miss a shot than to hit a friendly marine. Medics are a rarity, always let the people in the front shoot, don't try and move through them. Staying on grab intent [[File:Intent_Grab.png]](the yellow intent, hit 3 to use it) during a firefight is vital otherwise if you walk into someone who is also shooting with help intent [[File:Intent_Help.png]], meaning that both of you are in help intent, you will swap positions and get hit. If you do need to shoot through marines, you don't have to be a [[TGMC:Squad Smartgunner|Smartgunner]] to do so! | ||
| Строка 134: | Строка 114: | ||
Running makes you move faster at the expense of some stamina and melee accuracy (but you shouldn't be in melee as a Standard Marine anyway). Some attacks also do stamina damage, and if it reaches a sufficiently low level you get knocked over. Your current stamina can be seen by this lightning bolt [[File:Stamina_full.png]]. When it is emptied, it will look like this [[File:Stamina_empty.png]] and shortly becoming a lightning bolt that is darker blue, with a 100% text, indicating your fatigue. Taking further stamina damage will turn the lightning bolt orange and then red when completely empty. You will have to wait to recover from fatigue before your stamina portion starts regenerating. | Running makes you move faster at the expense of some stamina and melee accuracy (but you shouldn't be in melee as a Standard Marine anyway). Some attacks also do stamina damage, and if it reaches a sufficiently low level you get knocked over. Your current stamina can be seen by this lightning bolt [[File:Stamina_full.png]]. When it is emptied, it will look like this [[File:Stamina_empty.png]] and shortly becoming a lightning bolt that is darker blue, with a 100% text, indicating your fatigue. Taking further stamina damage will turn the lightning bolt orange and then red when completely empty. You will have to wait to recover from fatigue before your stamina portion starts regenerating. | ||
== Light == | ==Light== | ||
You may have noticed there's a button in the upper left of your screen. Click it to turn your armor light on. It is vital to keep the light on at all times, so you can see the environment and marines can see you. It is easy to get spooked by a marine in the dark and accidents may happen. | You may have noticed there's a button in the upper left of your screen. Click it to turn your armor light on. It is vital to keep the light on at all times, so you can see the environment and marines can see you. It is easy to get spooked by a marine in the dark and accidents may happen. | ||
<br> <b>Keep in mind that every time your armor gets taken off, either by you or by a medic reviving you, the light is turned off and has to be turned back on manually.</b> | <br> <b>Keep in mind that every time your armor gets taken off, either by you or by a medic reviving you, the light is turned off and has to be turned back on manually.</b> | ||
== Overcoming obstacles == | ==Overcoming obstacles== | ||
If there's a wooden barricade, use your knife to destroy it. If it's a plasteel one, click on it with an empty hand to flip it open, walk through and flip it closed. It is vital that you always close the barricade after you move through it to prevent enemies from easily passing it. | If there's a wooden barricade, use your knife to destroy it. If it's a plasteel one, click on it with an empty hand to flip it open, walk through and flip it closed. It is vital that you always close the barricade after you move through it to prevent enemies from easily passing it. | ||
| Строка 147: | Строка 127: | ||
You may also flip a table over by clickdragging it a certain direction, turning it into a piece of cover. This doesn't always work though, such as with wide or reinforced tables, and doesn't compare to a good metal or sandbag 'cade, but it's useful in a pinch. | You may also flip a table over by clickdragging it a certain direction, turning it into a piece of cover. This doesn't always work though, such as with wide or reinforced tables, and doesn't compare to a good metal or sandbag 'cade, but it's useful in a pinch. | ||
==Question?== | ==Question? == | ||
If you are lost or have a question, feel free to use the MentorPM under the admins tab in the top right to ask experienced players a question. They'll be happy to help! Alternatively you can also use OOC or LOOC chats to ask about something, although you should keep in mind to not give away information about the current ongoing round. | If you are lost or have a question, feel free to use the MentorPM under the admins tab in the top right to ask experienced players a question. They'll be happy to help! Alternatively you can also use OOC or LOOC chats to ask about something, although you should keep in mind to not give away information about the current ongoing round. | ||
==I wanna be more Important!== | ==I wanna be more Important! == | ||
Woah there cowboy! If you want to try a different marine role you can try the [[TGMC:Squad_Smartgunner|Smartgunner]] for extra firepower, or you could alternatively try out the [[TGMC:Maintenance_Technician|Ship Technician]] as a non-combat shipside role. | Woah there cowboy! If you want to try a different marine role you can try the [[TGMC:Squad_Smartgunner|Smartgunner]] for extra firepower, or you could alternatively try out the [[TGMC:Maintenance_Technician|Ship Technician]] as a non-combat shipside role. | ||
| Строка 159: | Строка 139: | ||
<span class="mw-customtoggle-0" style="font-size:small; display:inline-block; float:left;"><span class="mw-customtoggletext">[{{color|#2c39ff|<u>Expand</u>}}]</span> | <span class="mw-customtoggle-0" style="font-size:small; display:inline-block; float:left;"><span class="mw-customtoggletext">[{{color|#2c39ff|<u>Expand</u>}}]</span> | ||
<div | <div class="mw-collapsible mw-collapsed "> | ||
*'''Alamo:''' The tan transport dropship. | *'''Alamo:''' The tan transport dropship. | ||
*'''AP:''' Armor piercing. | *'''AP:''' Armor piercing. | ||
*'''BE:''' Battlefield Execution. Not allowed on our server. | * '''BE:''' Battlefield Execution. Not allowed on our server. | ||
*'''Bino(s):''' Binoculars, usually to refer to [[TGMC:Guide to fire support#Tactical Binoculars|Tactical Binoculars]] specifically. | *'''Bino(s):''' Binoculars, usually to refer to [[TGMC:Guide to fire support#Tactical Binoculars|Tactical Binoculars]] specifically. | ||
*'''FUBAR:''' Fucked Up Beyond All Recognition. | *'''FUBAR:''' Fucked Up Beyond All Recognition. | ||
| Строка 169: | Строка 149: | ||
*'''CAS:''' Close Air Support. Don't get hit by it! | *'''CAS:''' Close Air Support. Don't get hit by it! | ||
*'''CE:''' [[TGMC:Chief Ship Engineer|Chief Engineer.]] People never remember the "ship" part of their name. | *'''CE:''' [[TGMC:Chief Ship Engineer|Chief Engineer.]] People never remember the "ship" part of their name. | ||
*'''CIC:''' Combat Information Center. Where command lives. One of two popular last stand locations. | * '''CIC:''' Combat Information Center. Where command lives. One of two popular last stand locations. | ||
*'''CL:''' Corporate Liaison. Nanotrasen's bitch. | *'''CL:''' Corporate Liaison. Nanotrasen's bitch. | ||
*'''CMO:''' [[TGMC:Chief Medical Officer|Chief Medical Officer.]] Just a doctor with ''status.'' | *'''CMO:''' [[TGMC:Chief Medical Officer|Chief Medical Officer.]] Just a doctor with ''status.'' | ||
*'''Condor:''' Dedicated CAS plane. | *'''Condor:''' Dedicated CAS plane. | ||
*'''Cycle:''' A process in which a dropship travels from one place to another, usually between the ship and the LZ. | *'''Cycle:''' A process in which a dropship travels from one place to another, usually between the ship and the LZ. | ||
| Строка 187: | Строка 167: | ||
*'''IS:''' IronSugar. Helps with blood regeneration. | *'''IS:''' IronSugar. Helps with blood regeneration. | ||
*'''LOOC:''' Local Out Of Character. Can be done by pressing L. Like OOC, but ''local'', obviously. | *'''LOOC:''' Local Out Of Character. Can be done by pressing L. Like OOC, but ''local'', obviously. | ||
*'''LZ:''' Landing Zone. Where the Alamo or Tadpole lands. | * '''LZ:''' Landing Zone. Where the Alamo or Tadpole lands. | ||
*'''MeraDerm:''' Chemical mix of better healing meds that heals brute and burn damage quickly. | *'''MeraDerm:''' Chemical mix of better healing meds that heals brute and burn damage quickly. | ||
*'''MO:''' [[TGMC:Medical Officer|Medical Officer.]] The doctors that pull out all that machine gun shrapnel you have. | *'''MO:''' [[TGMC:Medical Officer|Medical Officer.]] The doctors that pull out all that machine gun shrapnel you have. | ||
| Строка 193: | Строка 173: | ||
*'''OB:''' [[TGMC:Guide to fire support#Orbital Bombardment|Orbital Bombardment.]] Don't get hit by it! | *'''OB:''' [[TGMC:Guide to fire support#Orbital Bombardment|Orbital Bombardment.]] Don't get hit by it! | ||
*'''PB:''' Point Blank. The act of shooting something at point blank range(right next to it). Commonly done with buckshot-loaded shotguns. | *'''PB:''' Point Blank. The act of shooting something at point blank range(right next to it). Commonly done with buckshot-loaded shotguns. | ||
*'''PMC:''' Private Military Contractor. Friendly ERT faction. Paid by Nanotrasen. | * '''PMC:''' Private Military Contractor. Friendly ERT faction. Paid by Nanotrasen. | ||
*'''PO:''' [[TGMC:Pilot Officer|Pilot Officer.]] The dipshit that flew to the wrong LZ. | *'''PO:''' [[TGMC:Pilot Officer|Pilot Officer.]] The dipshit that flew to the wrong LZ. | ||
*'''Pods:''' Drop Pods. For quick redeployment or playing at being an ODST. Or suicide. | *'''Pods:''' Drop Pods. For quick redeployment or playing at being an ODST. Or suicide. | ||
*'''Prae:''' [[TGMC:Praetorian|Praetorian Caste]]. Spits at you, menacingly. | *'''Prae:''' [[TGMC:Praetorian|Praetorian Caste]]. Spits at you, menacingly. | ||
*'''Rav:''' [[TGMC:Ravager|Ravager Caste]]. Big scary xeno with swords for fingies. | *'''Rav:''' [[TGMC:Ravager|Ravager Caste]]. Big scary xeno with swords for fingies. | ||
*'''Razorburn:''' Refers to Razorburn Grenades, which spills out a foam that creates razorwire. | * '''Razorburn:''' Refers to Razorburn Grenades, which spills out a foam that creates razorwire. | ||
*'''Req:''' [[TGMC:Guide to requisitions|Requisitions.]] Where you get the good schtuff. | *'''Req:''' [[TGMC:Guide to requisitions|Requisitions.]] Where you get the good schtuff. | ||
*'''RO:''' [[TGMC:Requisitions Officer|Requisitions Officer.]] The guy that gives you the good schtuff. | *'''RO:''' [[TGMC:Requisitions Officer|Requisitions Officer.]] The guy that gives you the good schtuff. | ||
*'''Rouny:''' [[ | *'''Rouny:''' [[Медиа:Thats a rouny.png|OOC joke.]] May be said as marine, though not excessively. Shouldn't be said in IC as a xeno. | ||
*'''RR:''' Can refer to 2 things: Russian Red, a healing chem, or a [[TGMC:Marine Equipment#T160|Recoilless Rifle]] | *'''RR:''' Can refer to 2 things: Russian Red, a healing chem, or a [[TGMC:Marine Equipment#T160|Recoilless Rifle]] | ||
*'''Sent:''' [[TGMC:Sentinel|Sentinel Caste]]. Spits at you. | *'''Sent:''' [[TGMC:Sentinel|Sentinel Caste]]. Spits at you. | ||
Версия от 15:52, 13 ноября 2021

|
Эта страница относится к TGMC.
TGMC это билд, созданный на основе CM-SS13 и переделанный под ТГ. |
Добро пожаловать!
Данное руководство должно помочь вам хотя бы выглядеть опытным морпехом. Но, как и на всех серверах, вам важно соблюдать правила. Сервер позиционируется как Медиум-РП, поэтому вам нужно хотя бы пытаться исключать мемы из общения и вести себя, подобая своему рангу. Следуйте военному закону, иначе вы можете быть арестованы, убиты или забанены.
Ваша приоритетная задача - заботиться о себе, о других морпехах, убивать ксеноморфов и уничтожить их улей. Экипируйся, вооружайся, лечись и превращай жизнь ксеноморфов в ад.
Вы проснулись от криосна
После того как вы завершили настройку своего персонажа, вы проснулись от криосна. Вы полуголый, голодный и, возможно, потерянный морпех. Но не стоит унывать, инженеры грамотно спроектировали корабль. Если вы не выбрали предпочитаемый отряд в Job Preferences, то вас распределят в случайный. Посмотрите в свой чат, чтобы определить какой именно. Не стоит грустить, если вы не попали в свой любимый отряд, потому что стандартный режим игры предполагает не битву между друг другом, а битву против общего врага - ксеноморфов. Не стреляйте по морпехам!
Почти на всех кораблях кафетерии расположены рядом с капсулами криосна, на некоторых вас до туда проведут цветные линии на полу. Очень важно сразу принять пищу, так как на поле боя весь ваш разум будет занят генерацией идей для выживания, а ваш рюкзак - всевозможными полезными предметами, которые вряд ли будут питательны. Подойдите к ближайшему вендору и закажите несколько порций еды. Не стоит есть с пола, еда рассчитана на всех морпехов. Среднестатистическому морпеху хватает двух протеиновых батончиков на всю свою жизнь!
Определить уровень голода поможет данная иконка в правой части экрана: ![]() Она принимает разные цвета в зависимости от заполненности желудка: оранжевый (Истощен), желтый (Голоден), отсутствует (Сыт), серый (Переевший).
Она принимает разные цвета в зависимости от заполненности желудка: оранжевый (Истощен), желтый (Голоден), отсутствует (Сыт), серый (Переевший).
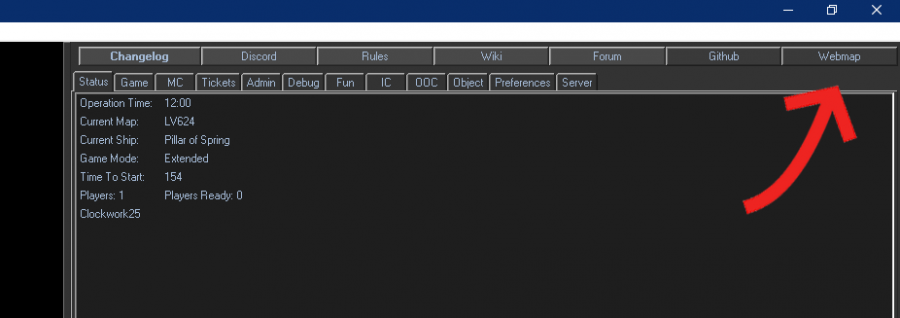
Так как разные корабли спроектированы по-разному, то для навигации вам поможет кнопка Webmap.
Получение снаряжения
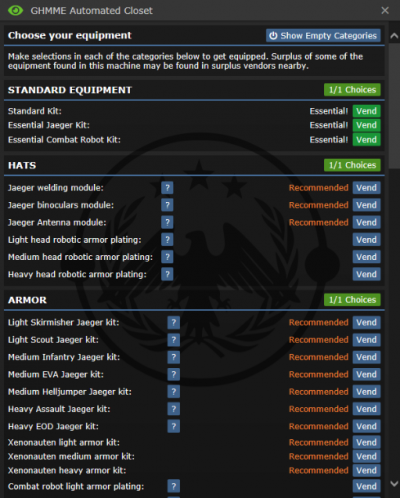
Итак, вы наполнили свой желудок и готовы к бою, но вот незадача, у вас нет одежды, брони и оружия. Для начальной подготовки пройдите к GHMME Automated Closet  и откройте его интерфейс, кликнув по нему.
Ваша броня
Для начала игры рекомендуется выбрать:
- Essential Jaeger Kit. (Вы получите униформу, перчатки, ботинки, наушник, паек, краску и боевой экзоскелет)
- Light/Medium/Heavy Jaeger kit. (Вы получите шлем, который надевается на голову и компоненты брони экзоскелета, а именно: нательные пластины, плечевые и коленные. Вы можете покрасить данные компоненты используя ЛКМ (иногда ПКМ) с краской (Green Facepaint) в руке. Выбрав следующие по списку пункты, вы получите нательный модуль для экзоскелета и модуль для шлема. После покраски и установки модулей можно прикреплять компоненты к выданному ранее боевому экзоскелету)
- Satchel. (Менее вместительный чем Backpack, но не имеет задержки для взяти предмета из сумки)
- Tactical black vest.
- Standard ammo belt.
- Firstaid pouch. (В будущем рекомендуется заменить на Medkit Pouch)
- Flare pouch. (Можно будет заменить на любой другой, но флаеров часто не хватает)
- General Purpose Storage Module. (Может вмещать две коробки с используемыми патронами)
- Mark 1 Tyr extra armor set.
- Tactical gas mask.
Ваше оружие
Заметьте: Вы можете выбрать любое оружие, которое вам понравится и экспериментировать с обвесами для него.
Экспериментируйте и получайте удовольствие от игры.
Вы никогда не будете обузой для своей команды.
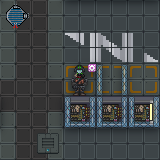
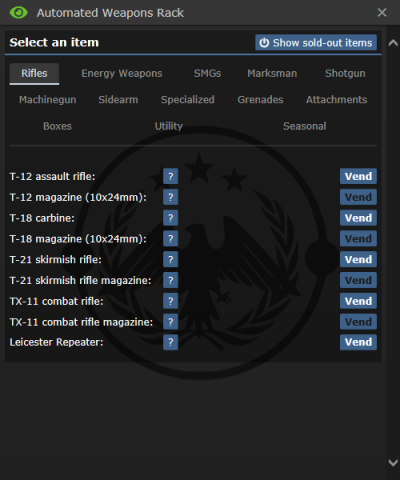
Рядом с вендором со снаряжением находится вендор с оружием Automated Weapons Rack  .
.
- Выберите одну T-12 Assault rifle
 и возьмите её.
 - Выберите шесть T-12 magazines.

- Возьмите один магазин в одну руку, а затем кликните им по винтовке в другой руке, чтобы зарядить магазин в неё.
- В левом верхнем углу, когда у вас винтовка в руке, появится иконка пули, регулирующая режим стрельбы (Firemode).
- После этого нажмите E или кликните с винтовкой в активной руке на ваш Suit слот. Возьмите магазины и поместите их в ваш разгрузочный жилет

Теперь пришло время добавить обвесов на вашу винтовку.
Ваши обвесы
Чтобы посмотреть какие обвесы вы можете повесить на оружие, осмотрите его (Shift+ЛКМ) а после этого нажмите на кнопку relevant information в чате. В появившемся окне вы сможете обнаружить полный список возможных обвесов, а также статистику вашего оружия Некоторые обвесы не могут быть удалены, например T12 имеет неснимаемый приклад.
Прикрепление обвесов схоже с перезарядкой: В одной руке винтовка, в другой обвес и нажать обвесом на винтовку.
Getting other Gears
After you're done, you might also want to grab a few flare packs and put them into your satchel. Flares serve an important role, giving you intel and may prevent you from walking into an ambush. Always flare a room first before pushing into it with your squad. You may notice a requisitions area, which is where you can get more advanced gear such as grenades. Since your basic setup is complete for now, you can ignore this area.
Heading to Planetside
After this, you are almost ready to rumble! Briefing is nearly always held over radio, as it is more time efficient than making people stand around. They are usually announced around 12:05-12:10, but should you miss them ask your squadmates (;) or on the general channerl (:h). You should head through the briefing area and into the hangar, which is usually found west of briefing, if you're unfamiliar with the ship's layout use the webmap button at the top right, and click 'Ship' to access the online map. There will a beige dropship, the Alamo. Board the ship, find a seat and buckle in. The PO or a squad leader should launch once most people are inside. The flight shouldn't take long, you may use this time to talk with your squad and other marines. Press T and use ; to talk on your squad channel and :h or .h to talk on the general channel that everyone has access to.
Battle, or TIME TO UNGA
When there's an enemy nearby or you hear shots or other signs of potential hostile activity, take your rifle out of your armor slot by either clicking on the sprite or pressing E. When you want to shoot, always make sure to wield it by hitting Z with it in your active hand, then click somewhere to shoot. Never fire a weapon one-handed as it causes a lot of recoil; you can tell when the screen shakes a lot. Always stay near your allies so that they may help you out when you get in a pinch.
If your rifle is out of ammo and you have an ammo belt full of fresh magazine
- Step 1
- press Z to unwield your rifle since you need an empty hand to get your new magazine
- Step 2
- press X to change the active hand from your rifle hand to your empty hand
- Step 3
- press E to instantly get your new magazine from your ammo belt
- Step 4
- click the sprite of your rifle with the magazine on your hand
- Step 5
- press X to change the active hand from your empty hand to your rifle hand
- Step 6
- press Z to wield your rifle.
| |
Generic FC говорит: «Whew! That was fun reloading your gun under heavy fire!» |
Firing lanes
It is very important to move in one line with your fellow marines and fire in a way where you won't hit your squadmates. It is better to miss a shot than to hit a friendly marine. Medics are a rarity, always let the people in the front shoot, don't try and move through them. Staying on grab intent ![]() (the yellow intent, hit 3 to use it) during a firefight is vital otherwise if you walk into someone who is also shooting with help intent
(the yellow intent, hit 3 to use it) during a firefight is vital otherwise if you walk into someone who is also shooting with help intent ![]() , meaning that both of you are in help intent, you will swap positions and get hit. If you do need to shoot through marines, you don't have to be a Smartgunner to do so!
, meaning that both of you are in help intent, you will swap positions and get hit. If you do need to shoot through marines, you don't have to be a Smartgunner to do so!
Aim Mode
Through the miracle of aiming ![]() you can fire through your fellow marines with reckless abandon! Albeit with a slower move speed and fire rate. Note that not all weapons can be aimed.
you can fire through your fellow marines with reckless abandon! Albeit with a slower move speed and fire rate. Note that not all weapons can be aimed.
Stamina
You may have noticed that you have been walking this time.
If you hold down Alt, you will begin to run. If you press 5, you change your movement intent, meaning that you don't need to hold down Alt while running.
Running makes you move faster at the expense of some stamina and melee accuracy (but you shouldn't be in melee as a Standard Marine anyway). Some attacks also do stamina damage, and if it reaches a sufficiently low level you get knocked over. Your current stamina can be seen by this lightning bolt ![]() . When it is emptied, it will look like this
. When it is emptied, it will look like this ![]() and shortly becoming a lightning bolt that is darker blue, with a 100% text, indicating your fatigue. Taking further stamina damage will turn the lightning bolt orange and then red when completely empty. You will have to wait to recover from fatigue before your stamina portion starts regenerating.
and shortly becoming a lightning bolt that is darker blue, with a 100% text, indicating your fatigue. Taking further stamina damage will turn the lightning bolt orange and then red when completely empty. You will have to wait to recover from fatigue before your stamina portion starts regenerating.
Light
You may have noticed there's a button in the upper left of your screen. Click it to turn your armor light on. It is vital to keep the light on at all times, so you can see the environment and marines can see you. It is easy to get spooked by a marine in the dark and accidents may happen.
Keep in mind that every time your armor gets taken off, either by you or by a medic reviving you, the light is turned off and has to be turned back on manually.
Overcoming obstacles
If there's a wooden barricade, use your knife to destroy it. If it's a plasteel one, click on it with an empty hand to flip it open, walk through and flip it closed. It is vital that you always close the barricade after you move through it to prevent enemies from easily passing it.
If you see a table or a window frame, drag your character's sprite onto the obstacle or ctrl+click on the obstacle with an empty hand. This should allow you to climb through after a short animation.
You may also flip a table over by clickdragging it a certain direction, turning it into a piece of cover. This doesn't always work though, such as with wide or reinforced tables, and doesn't compare to a good metal or sandbag 'cade, but it's useful in a pinch.
Question?
If you are lost or have a question, feel free to use the MentorPM under the admins tab in the top right to ask experienced players a question. They'll be happy to help! Alternatively you can also use OOC or LOOC chats to ask about something, although you should keep in mind to not give away information about the current ongoing round.
I wanna be more Important!
Woah there cowboy! If you want to try a different marine role you can try the Smartgunner for extra firepower, or you could alternatively try out the Ship Technician as a non-combat shipside role.
Terminology
Starting out, you might not understand some of the things people scream over the radio. Here's a list of some of the commonly used phrases that some new players frequently ask about, and their explanations!
[Expand
]
- Alamo: The tan transport dropship.
- AP: Armor piercing.
- BE: Battlefield Execution. Not allowed on our server.
- Bino(s): Binoculars, usually to refer to Tactical Binoculars specifically.
- FUBAR: Fucked Up Beyond All Recognition.
- Cap: The Captain. Commander of the operation and effectively your boss' boss alongside the FC.
- CAS: Close Air Support. Don't get hit by it!
- CE: Chief Engineer. People never remember the "ship" part of their name.
- CIC: Combat Information Center. Where command lives. One of two popular last stand locations.
- CL: Corporate Liaison. Nanotrasen's bitch.
- CMO: Chief Medical Officer. Just a doctor with status.
- Condor: Dedicated CAS plane.
- Cycle: A process in which a dropship travels from one place to another, usually between the ship and the LZ.
- DS: can refer to 2 things: Dropship(commonly refers to the Alamo specifically), or Deathsquad. Hostile ERT faction. Accept death, resistance is futile.
- Engi: can refer to 2 things: Engineers in general(be it the Squad or Ship variety), or the location where generators usually are.
- ERT: Emergency Response Team. The guys that come when you call them via distress signal when things go FUBAR. Might not be friendly.
- Evac: Evacuation. For cowards.
- FC: The Field Commander. That headless guy you're supposed to be following.
- FF: Friendly Fire. Don't do this.
- FOB: Forward Operating Base. Where the Alamo lands and where marines hold their ground.
- GL: Grenade Launcher.
- HC: TGMC High Command. TGMC's counterpart to Nanotrasen's Centcom.
- HE: High Explosive.
- IA: ImiAlky. Chemical mix of Imidazoline and Alkysine, which heals eye and brain damage.
- IS: IronSugar. Helps with blood regeneration.
- LOOC: Local Out Of Character. Can be done by pressing L. Like OOC, but local, obviously.
- LZ: Landing Zone. Where the Alamo or Tadpole lands.
- MeraDerm: Chemical mix of better healing meds that heals brute and burn damage quickly.
- MO: Medical Officer. The doctors that pull out all that machine gun shrapnel you have.
- NT: Nanotrasen. The fuckups that caused all this mess.
- OB: Orbital Bombardment. Don't get hit by it!
- PB: Point Blank. The act of shooting something at point blank range(right next to it). Commonly done with buckshot-loaded shotguns.
- PMC: Private Military Contractor. Friendly ERT faction. Paid by Nanotrasen.
- PO: Pilot Officer. The dipshit that flew to the wrong LZ.
- Pods: Drop Pods. For quick redeployment or playing at being an ODST. Or suicide.
- Prae: Praetorian Caste. Spits at you, menacingly.
- Rav: Ravager Caste. Big scary xeno with swords for fingies.
- Razorburn: Refers to Razorburn Grenades, which spills out a foam that creates razorwire.
- Req: Requisitions. Where you get the good schtuff.
- RO: Requisitions Officer. The guy that gives you the good schtuff.
- Rouny: OOC joke. May be said as marine, though not excessively. Shouldn't be said in IC as a xeno.
- RR: Can refer to 2 things: Russian Red, a healing chem, or a Recoilless Rifle
- Sent: Sentinel Caste. Spits at you.
- SD: Self Destruct. Where to go if you need the ship to go boom. One of two popular last stand locations.
- SG: Smartgunner. The guy that's supposed to be behind you, but isn't for some reason.
- SL: Your boss. Also doubles as a walking compass.
- SO: Staff Officer. The guy screaming over comms telling you what to do.
- SOM/SoM: Sons of Mars. Hostile ERT faction. Shoot at when fired upon.
- SSD: Sudden Sleep Disorder. Catch-all IC term for being unable to play, such as when AFK or when disconnected.
- ST: Ship Technician. The bored shipside guys in blue.
- Surv: Survivor. They won't survive. Except when they end the round by killing all xenos before marines even deploy, an event called a "Survivor Major".
- Tad: The Tadpole. The dark grey mini-dropship used by those with suicidal tendencies or genius level intellect. Or both.
- Tangle/Tanglefoot: Plasma drain stuff that limits xeno abilities. Can refer to the OB load or the grenade.
- Unga: Catch-all term to refer to marines or their mentality, usually refers to their recklessness specifically.
- QC: Quick-Clot. Stops internal bleeding.
- WP: White Phosphorus. Usually refers to White Phosphorus Grenades, which are better incendiary grenades. Perfect for warcrimes!
- Xeno(s): The enemy. Shoot on sight.
- XRT: Xeno Response Team. Hostile ERT faction. Consists of extra xenos, because fuck you that's why.
| TGMC Должности 
| ||
|---|---|---|
| TGMC | ||
| Командование | ||
| Инженерия и Снабжение | ||
| Медицина | ||
| Морпехи | ||
| Гражданские | ||
| Роботизированные | ||
| Ксеноморфы | ||
| Тир 0 | ||
| Тир 1 | ||
| Тир 2 | ||
| Тир 3 | ||
| Тир 4 | ||
| Остальные | Отряд Быстрого Реагирования, | |

