Руководство по атмосфере
Причина: Some gases and gas reactions may have had additional changes early 2021. Also: Smart Pipes: https://github.com/tgstation/tgstation/pull/58038
This is the Guide to Atmospherics. When properly initialized, Atmosia can keep the station aired-up through nearly any emergency. Improperly initialized, it's a waste of space at best and an outright fire hazard at worst.
We will walk through this step by step, playing with various concepts. We will discuss the more practical aspects first, and then move on to gaseous synthesis, and finally to the why and how of atmospherics. By reading this guide you will learn how to transform Atmos from a waste of space to an actually useful addition. We will go through all kinds of theory, so this may be tough, but it will also ensure you know exactly how and more importantly how Atmos works the way it does, making you ready for all kinds of situations.
See also:
Atmospherics 101: Basic Theory, Layout, and Custodian of The Air
You, dearest atmospheric technician, have one main purpose: Keeping the station not too hot, not too cold, pressurized, and breathable. You might be able to synthesize difficult gases, but derelict this basic duty and you are not a good atmospheric technician.
The Atmos Devices
This will be a section detailing the overall function, and some specifics, of the various pipes, pumps, and other devices. Some details will be missed, but it will provide a basis. The first instance of a device running into a unique mechanic will be explained in further length.
 Digital Valve
A valve that opens when clicked, and connects the two pipenets it separates when doing so. Counter to pumps, it experiences no delay in its gas transfer. It essentially acts as a pipe. Has 200L of volume on one side, and 200L on the other end. This can be operated by both carbon mobs such as humans, excluding xenomorphs, and silicons.
 Pressure Valve
An activatable valve that lets gas pass through if the pressure on the input side is higher than the set pressure.
 Manual Valve
Acts identically to a Digital Valve, however, the manual valve does not allow silicons to operate it.
 Pressure Pump
An oddball case. Like all pumps, it separates connected pipenets if there is nothing else connecting them. Has a maximum pressure of 4500 kPa. All pumps work by pumping the contents within them to the other side, which is 200L on one side, and 200L on the other. Any pump can not pump gas that is not actually in it, which means that very large connected pipenets will have lower pump speeds. Pressure pumps work by gradually building up to its set pressure per tick. Because of this, pressure pumps slow down when approaching their target pressure, and will not quite match their pressure after a very long time, but will get very close.
 Volume Pump
The volume pump is similar to the pressure pump, but operates differently. It has a pressure limit of 9000 kPa. However, this limit only kicks in when the output pipenet is currently over 9000 kPa. The pump will work if the output pipenet is below 9000 kPa, even if the resulting pressure of this action would be way higher than 9000 kPa. Counter to the pressure pump, this pump works on a L/s basis. This has a 2x200L volume as well, so you pick how much of the volume in the pump is actually pumped to the other side by changing the number. Because its max speed is 200 L/s, it will always outpace and outpressure the pressure pump. Can be overclocked using a multitool, which will cause its pressure limit to be dependent on the input pipenet, which will tend to make the maximum output pressure higher. However, this will cause 10% of gas running through it to spill.
 Passive Pump/Gate
These are a combination of pumps and valves. They work up to their set pressure, with a maximum of 4500 kPa. These can never do more than equalise the two connected pipenets, just as valves do. However, they only work one way, rather than mixing the gas between the two pipenets perfectly as valves do. Think of them as a pressure pump that only equalises pressure between two pipenets.
 Unary Vent
The vent will pump gas into the room it is in, depending on the air alarm settings of the room. The air alarm has two settings to worry about, External, or Internal. External works by making the vent pump gas from its connected pipenet into the room until the room, or more accurately, the tile, matches the pressure that is set. The max pressure you can configure for External is 5066 kPa, and it slows down when approaching the set limit, as pressure pumps do. Internal works by pumping gas into the room from the pipenet until the pressure set matches the pressure in the connected pipenet. Examples: a vent set to External 200 will pump gas into the room until it is 200 kPa. A vent set to Internal 300 will pump gas into the room until the connected pipenet's pressure is 300 kPa, regardless of room pressure. As such, Internal 0 will always pump at full strength. This same effect can be achieved by turning off both External and Internal. The vent has a maximum speed it can pump at, even when extremely pressurised.
 Passive Vent
An unpowered vent that equalizes the internal and external gases. Think of it as a simple open ended pipe into the atmosphere. It is not interactable and cannot be closed. It too, is not restricted by pressure as with the other vents, opening possibilities for interesting shenanigans.
 Injector
The injector is similar to the vent in that it pumps gas onto the tile it is on. However, it is not controlled by an air alarm, but rather works by hand. It is also in L/s units again, similarly to the volume pump. Also similarly to the volume pump, it is the faster one when compared to its pressure based cousin, the vent. It does not have a maximum pressure change per second, as vents do, and will always outpace them. This comes at the cost of the control that vents give you.
 Scrubber
The gas sucking cousin of the vent, which sucks gas into the connected pipenet. Scrubbers are operated using the connected air alarm. They only suck in gas that is on their tile, unless you set their range to Expanded, in which case it'll suck in a 3x3. Setting them to Siphon will make them suck in every gas. If the scrubber is not on siphon, you can select specific gases for it to suck into its pipenet. The more gases are selected to scrub, the more power is used.
 Heat Exchanger
Place two of these next to each other, facing each other, and they will equalize the temperature of the gases inside them. The heat exchanger is not part of the (more widely used) heat exchange pipes system.
 Filter
The filter is the first device that connects 3 pipenets. It can be set to a single gas, and it will dump this gas to the side it is pointing in. All gas that is not selected will continue straight forward, as the arrow is pointing in a single line. When set to Nothing, it will allow all gas through the straight path. The filter works in L/s, and as such does not experience pressure related slowdowns, however, it has a pressure maximum of 4500 kPa. When EITHER OUTPUT SIDE is 4500 kPa or above, the filter will not function, not allowing any gas to pas. That is, both in a straight line and on its offshoot, the pressure must be less than 4500 kPa.
 Mixer
Mixer
The mixer also requires 3 connections to function, as the filter does. The mixer will mix the two incoming gases using the ratio the user inputs, starts off at 50/50. Node 1 is the input in a straight line with the ouput, Node 2 is the offshoot compared to the output. Both inputs need to have gas in them to function unless a side with gas in it is set to 100%, in which case it will function and purely let that side through. Is pressure based, with the associated properties. Also has a pressure maximum of 4500 kPa. The mixing is influenced by temperature following the ideal gas law. When one of the input sides is hotter compared to the other input, it will let less of this side's gas through, mol-wise. This will give you scuffed ratios if you do not equalise temperatures, if you need the precision, make sure they're equal.
 Heat Exchange pipes
Functions like regular pipe, however, this will attempt to equalise the temperature between the pipenet and the space it is in. This is based on heat capacity, which can be found on this page. Higher heat capacity means a gas will soak in more energy, which means it is better at cooling when cold, and better at heating when hot. These pipes commonly see use in Supermatter setups, to cool down the coolant by using these pipes in space. However, they can also be used to heat up places, of course. Has a 10K efficiency loss. Space is 2.7K, but heat exchange pipes will only cool the gas in them to be about 22.7K.
 Heat Exchange Junction
These are used to transfer from normal pipes to heat exchange pipes. These need to be between a pipe, or pump, etc. and heat exchange pipes for gas to actually be transferred between the two different kinds of pipe. While this pipe looks partially like a heat exchange pipe, it does not equalise temperature in the way that heat exchanging pipes do. It only looks like it does, so these can be safely connected to any pipe in a normal room without risk.
 Layer Adapter
Connects the 5 different layers of pipenets. For most stations, the red scrubber network will be on layer 2 while the blue air supply pipes will be on layer 4. Default layer is 3. Pipes on different layers do not interact with one another.
Canisters
These hold gases in a portable manner. However be VERY CAREFUL with them when you're dealing with hot gases or exothermic reactions (such as burnmixes, or even just freon formation), as they have pressure and temperature limits. (Note: All pressure limits shown here are adjusted by a random "quality rating" up to 20% above the stated pressure limit)
Canister frames may be made using 5 iron. Tier 1 canisters (made by 5 iron used on a canister frame) can hold up to 46000kPa or 5000K, and have a volume of 1000L. Tier 2 canisters (made by 5 plasteel used on a tier 1 canister frame) can hold up to 4600000kPa or 500000K, and have a volume of 3000L. Tier 3 canisters (made by 1 bluespace crystal used on a tier 2 canister frame) can hold up to 9.2e13 kPa or 1e12K, and have a volume of 5000L. Tier 3 canisters are functionally invulnerable, as recent changes have made it such that it is nearly impossible to get gases above 1e8K.
Stationary Tanks
These are tanks that are immovable. They are superseded by tier 2 canisters (and even tier 1 to an extent) in almost every way. They can be made by making a tank frame using 4 plasteel sheets and then using 20 sheets of a material of your choice on them. They have a volume of 2500L and a default pressure limit of 20000kPa. The pressure limit is affected by a material modifier, with glass giving 2000kPa and plasteel giving 30000kPa.
Useful Tips
Scrubbers, vents, injectors, valves, pumps, filters, and mixers can be safely unwrenched without spilling gas on a tile. Especially valves serve as a perfect alternative to a normal straight pipe, when wanting to be more safe with hot gas.
Most Atmospherics objects and machines can be operated with CTRL+click and ALT+click. CTRL+click will turn them on and off, ALT+click will max them out.
Panic Siphon on air alarms turns off all vents and sets scrubbers to Expanded range Siphoning. The contaminated setting will set the vents to normal atmospheric pressure, and scrubbers to Expanded range, and sucking in every gas that isn't Nitrogen or O2.
Pipes, vents, and other Atmospherics objects can be placed in walls! Most of the time, it is easier to dump gas into walls rather than trying to dump it in space. Even if the wall is destroyed or removed it will not spill the gas.
4-way Manifolds have the same volume as two pipes on top of each other, going north to south and east to west. Because of this, optimal usage of Heat Exchange pipes tends to be using a whole bunch of 4-way Manifolds.
Freezers and heaters can be placed directly on pipes, and they'll connect to it! Also, did you know that Freezers and Heaters can switch pipe layer by using a multitool on their board?
Because of the slow nature of pumps, they should be generally avoided unless looking for a specific purpose. Volume pumps are great for regulating speed consistently and pressuring pipenets because of their 9000 kPa limit. Pressure pumps are great for regulating pressure and slower gas movement, be creative!
Many, many things can be done using layer manifolds and different piping layers. No two ways about it, you'll have to experiment!
The Atmos Tools
Main page: Atmospherics items
Rapid Pipe Dispenser
This is your Rapid Pipe Dispenser. There are many like it, but this one is yours. The main tool of your trade, the RPD is what you use to generate new atmospheric devices. Use it in modifying the station's layout, in making new production compounds, in adding scrubbers and vents to various parts of the station, and much, much, more. Use it and use it well. Keep in mind that this device sparks, and it sparks a lot. Sparks can create fires if there are flammable gases around.
Analyzer / BreathDeep Catridge
Where the RPD is your sword, the Analyzer ![]() is your eye. Use this in identifying various gases in various pipelines (more on pipelines later), in analyzing the air around you, in identifying problems, harmful gases, and other various atmospheric related occurances.
This is slightly less related to the job, but the Analyzer also has a barometric function; giving you information on incoming storms when Alt-Clicked on planetary environments.
is your eye. Use this in identifying various gases in various pipelines (more on pipelines later), in analyzing the air around you, in identifying problems, harmful gases, and other various atmospheric related occurances.
This is slightly less related to the job, but the Analyzer also has a barometric function; giving you information on incoming storms when Alt-Clicked on planetary environments.
ATMOS Resin
The Backpack Firefighter Tank![]() can switch modes to launch transparent ATMOS resin instead of extinguisher. This resin has the following effects:
can switch modes to launch transparent ATMOS resin instead of extinguisher. This resin has the following effects:
- Repairs hull breaches similarly to Metal Foam.
- Cleans the air from toxins.
- Normalises air temperature to room temperature (20°C or 293.15K).
- Removes slipperiness from floors (from water etc).
- The foam itself is not slippery.
To use the Backpack Firefighter Tank, equip it on your backpack slot and click the new hud icon to take out the nozzle![]() . You can then cycle modes between extinguisher, resin launcher and single tile resin launcher (foamer) by activating the nozzle in your hand. It spends water when used. Examine the nozzle to see water remaining. This anti-breach and firefighting tool can be ordered from cargo or found in atmospheric lockers.
. You can then cycle modes between extinguisher, resin launcher and single tile resin launcher (foamer) by activating the nozzle in your hand. It spends water when used. Examine the nozzle to see water remaining. This anti-breach and firefighting tool can be ordered from cargo or found in atmospheric lockers.
ATMOS Holofan
The holofan ![]() is a wonderful tool that can project barriers which block gas movement. You can use these holofans to isolate breaches, prevent a spill from getting worse, or even to do basic retooling of the atmospheric layout (such as using a holofan on a pressurized plasma pipe you are about to unwrench). Keep in mind however, that holofans does not block the superconduction (explained later) of hot gases and is less reliable in very high temperature environments, especially when fire is involved.
is a wonderful tool that can project barriers which block gas movement. You can use these holofans to isolate breaches, prevent a spill from getting worse, or even to do basic retooling of the atmospheric layout (such as using a holofan on a pressurized plasma pipe you are about to unwrench). Keep in mind however, that holofans does not block the superconduction (explained later) of hot gases and is less reliable in very high temperature environments, especially when fire is involved.
Atmospherics Layout
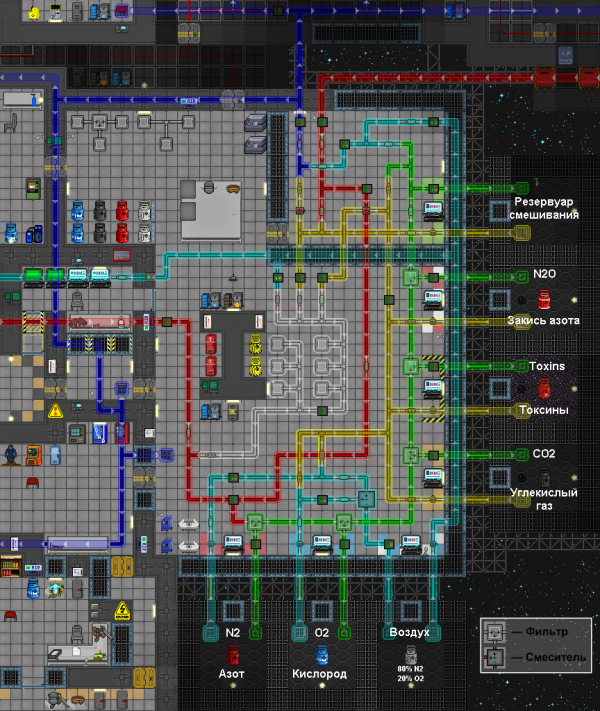
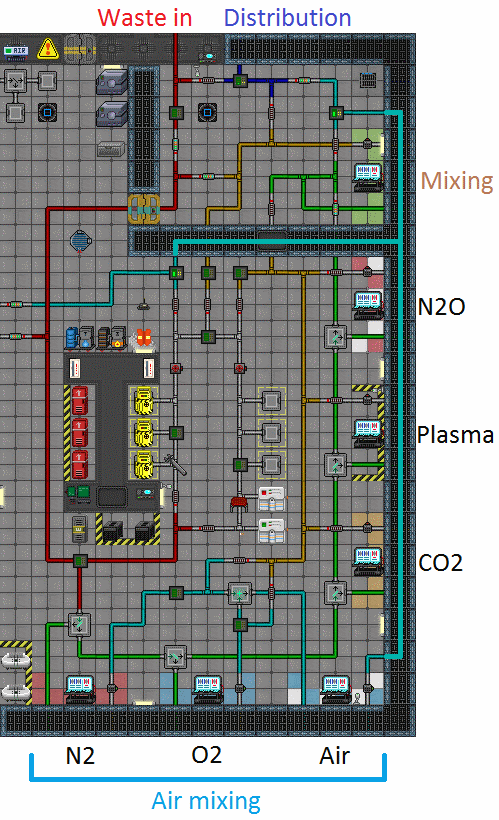
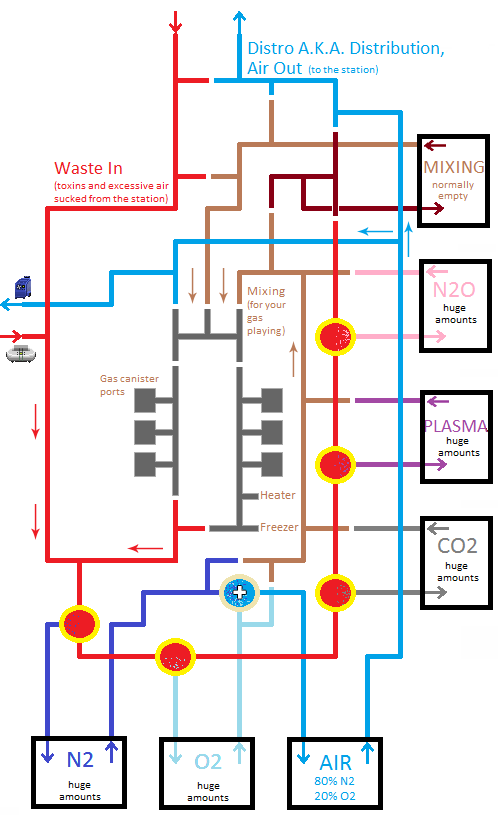
Here are two pictures of the atmospheric pipe system. Right one is a "simplified" version of the left picture. Yellow circles representing the filters which filter out a certain gas from the Waste In -gasmix. The light yellow circle near the lower middle represents the mixer which mixes N2 and O2 into a breathable air mix.
Atmospherics is pretty simple, but the pipe layout makes it slightly confusing for the untrained eye. There are 4 major pipe "loops":
- The dark blue pipe loop is the distribution loop. It sends air to all the vents on the station for the crew to breathe.
- The cyan air mix pipe loop, which is specialized to mix and provide the air mix to the distribution loop, and is used to fill air pumps outside the front door of Atmospherics.
- The red/green pipe loop, which retrieves the gas in the station via the air scrubbers (red loop) and passes them through a set of filters (green loop).
- The yellow pipe loop, internal to Atmospherics, which is used for custom gas mixes that can be fed into the canister charging station in the middle of atmospherics, or fed into the mixing tank.
The tanks (the small rooms in space just outside of Atmos) of the station's atmospherics network, unlike in the rest of the station, are rooms filled with very high pressure of the appropriate gas. The output of these rooms are controlled by their respective Supply Control Computer, an on/off valve, and an output pump for each loop. Note that these rooms can be depleted, especially if someone makes a hole in a tank's external wall.
To understand how the breatheable air mix is mixed, try following these steps and looking at the map at the same time, it starts on the south end of Atmospherics, like so:
- The gasses are pumped through the cyan tubes from their respective tanks (N2, O2).
- They are mixed in the air tank (Air) to a 1/5 mix of O2 and N2.
- The breathable gas is then pumped through the cyan loop to the north of Atmospherics.
- And finally it's pumped into the dark blue distro loop and out to the station for everyone to breathe.
Next let's make up an example situation to see how the waste system works in action:
- Scientist Bill messes up and fills the Toxins Lab with plasma but fortunately manages to evacuate the room safely.
- Being an otherwise ideal situation Atmos-wise, the Toxins Lab's air scrubbers have been set to filter out all hazardous gases (they're not set by default, this has to be done through the Air Alarm manually or by asking the AI to do it) and plasma starts to get sucked through the scrubber into the waste pipes.
- The plasma arrives to the Waste In -loop (the red pipe loop) at Atmos. It travels south through the pipes, its first stop being the N2 Filter.
- If there was any Nitrogen in the waste gas, it would get filtered out here, and the rest of the gas continues its journey through the waste loop, same thing happening at every filter.
- The plasma finally reaches the Plasma Filter.
- Here the plasma gets extracted from the waste gas and pushed into the big plasma tank-room outside the windows.
- The plasma stays in the room until someone decides to pump it out.
- Scientist Bill by now notices that the Toxins Lab has no plasma anymore and is able to safely continue his work. Yay!
Setting Up Atmospherics
It's about time we stop with the theory and throw it out the window and get down to business. The two machines at the top can dispense infinite pipes, and your wrench can disconnect and connect pipes to each other. the better option, of course, is to use the rapid pipe dispenser that will spawn in atmospheric technician lockers and the engine room on some maps which can create and destroy infinite pipes.
Next up is a very simple step by step guide how to set up the Atmospherics pipe system to be (nearly) as efficient as possible. Note that this is only one style how to set up the pipes, there are many ways and they all have their own pros and cons!
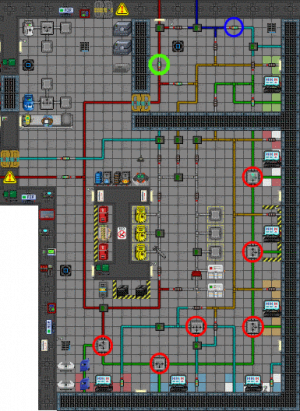
- For the love of Nanotrasen, at least do this:
- Get a Volume Pump from the Pipe Dispenser at the north side of Atmos and replace the green circled normal pump with a volume pump(or a valve if you are using the waste loop as a large volume mix chamber), making the waste gas -system >100x more efficient. We want the waste gas sucked from the station into the waste system as soon as possible!
- Set all red circled filters ON and set them to maximum pressure (200 L/s) so waste gases will actually be moved.
- This is good as well:
- Go through the N2 and O2 (besides southern wall) and set their output to
4500300 kPa. 4500 kPa drains all of atmos' gases way too quickly, there really isn't any reason to turn the pumps up to maximum unless you're flooding. - Set the pumps next to the computers at
4500300 kPa also, so the gases being pushed out of the gas-room get moved fast too. - Set the Air-computer's output to some amount over 300 kPa, the pumps automatically keep the gas throttled.
- Replace the blue circled normal pump with a Volume Pump(potentially a valve here, there are risks to this, however) as well, but notice; there are risks involved and all of them are covered at the pros and cons -section below.
Pros and cons of this whole setup:
- + Quick toxin filtering: In case of a toxin leak, waste gas will be sucked out quickly (if the area's air alarms are set to filter out all the toxins, that is, by default they are NOT filtering anything besides CO2).
- + Quick repressurization: In case of a breach, air will be poured out with a nice pace, helping you re-pressurize the room quicker after the breach is fixed.
- + Reduced pipe sabotaging: With this setup, its harder for the grifflords to fuck up pipes in the maintenance tunnels. In a room with the default 101.3 kPa atmospheric pressure, pipes with more than 303.9 kPa pressure fling the unwrencher in a random direction.
- - Air Alarm sabotages: The station is more vulnerable for sabotage through air alarms. Someone can quite easily hack an air alarm somewhere and set the vents to push out air at maximum pressure, resulting in overpressurization.
- - Space wind: In case of a breach, until the hole is fixed, you'll probably spend a small while fighting against the huge air current, a.k.a. "space wind", if you don't switch the vents off during the repair. This is mostly just annoying. to deal with this, find a pair of magboots.
- - Very slow pipe manipulating: If you suddenly have to modify any of the distribution pipes around the station, you need to lower the pressure to under 303.9 kPa if you don't want to be flung around like a leaf in the space wind, which can take a long time.
A little safer, but not as efficient, way of setting up the system is leaving the blue circled normal pumps completely alone or maybe raising the pressure to 315 kPa. This pressure is enough for quick pipe manipulating and for a sufficient air distribution.
Done correctly, Atmosia should be pumping good air just faster than it's lost, and draining bad air away as fast as the traitors can set it on fire or alternatively draining good air away as fast as a malf AI can siphon it. You can go kick back in the bar like a boss and wait for the inevitable minor station damage and cries of "Call the shuttle!" on the radio from folks who don't even know it ain't a big deal.
Your Very Own Customized Mix
To create a custom mix of gas, turn on the output of the supply control computers, open the manual valves, and turn the output of the pump to what you wish it to be. The gas will travel through the orange pipes into the mixing chamber. The gas mix is pumped into the mixing chamber via a pump north of the orange loop.
The mix obtained can then be pumped into the distribution and filtering loop or used to fill canisters. Remember to turn off the pump between the yellow and red pipe network or your custom mix will just go into the red waste loop.
Atmospherics and The Station
Over the course of the shift, various parts of the station might regrettably explode and vent out your precious, precious air. This is where you come in. Grab your nearest metal or Rapid Construction Device ![]() and rush off to seal the breach. Grab adequate pressure and temperature protection if you have not. If your distribution loop is ready, refilling should be absolutely easy. Rush to the air alarm in the corresponding area and fill the air by interfacing with the Air Alarms
and rush off to seal the breach. Grab adequate pressure and temperature protection if you have not. If your distribution loop is ready, refilling should be absolutely easy. Rush to the air alarm in the corresponding area and fill the air by interfacing with the Air Alarms ![]() . You might expediate the process by setting the operating mode to "Refill" or even to turn off external pressure checks by manually setting each vents under "Vent Controls" to Internal and 0 kPa.
. You might expediate the process by setting the operating mode to "Refill" or even to turn off external pressure checks by manually setting each vents under "Vent Controls" to Internal and 0 kPa.
Over the course of the shift, the environment might become cold or hot too. Common sources of coldness include space and icemoon wind rushing in, check for opened airlocks! Common sources of heat are usually gas combustion ![]()
![]()
![]() and Pyroclastic Anomalies. To combat the temperature problems, there are many things that you could do:
and Pyroclastic Anomalies. To combat the temperature problems, there are many things that you could do:
- You could utilize Space Heaters

- You could cycle the air
 ; be it from the "Cycle" Operating Mode or from manually Panic Siphoning and setting the air to Refill.
 - You could even build a thermomachine
 and haul a portable pump
  to a location and keep cycling the air locally. This will heat up or cool down the air very quickly.
 - Your trusty ATMOS Resin
 will also set air to 20 degrees Celcius and might be of great use here, but keep in mind that it seals scrubbers and vents off.
 - You also have the holofan
 to prevent the cold from spreading further.
You have great tools at your disposal, but also a great adversary to face. Good luck in your job as the Custodian of The Air!
Atmospherics 201: Gaseous Synthesis, Machinery, Further Theory, and Optimization
The Gases and Their Functions
Let's start with some theory about the gases. Below are the different gases that can be found in-game.
Quick note: The endothermic and exothermic descriptions in these gaseous reactions are measured with respect to enthalpy. Heat capacity can change, and this means that there might be cases where you have an exothermic reaction but the temperature is actually falling. Experiment!
Gaseous Export: Gas canisters can be exported through cargo in exchange for money. They are however, subject to elasticity and will give diminishing returns for each mole exported. Gases will roughly fall to half their credits per mole value at around the 2100 moles mark, quartering at 4201 moles, and becoming one tenth of their original base export price at 6978 moles. This diminishing returns are tracked individually per canister.
 O2
O2
Our first base gas is Oxygen. All humans, pets, and lizard-people need more than 16 kPa of oxygen in the air or internals to breathe. Any less and the creature starts to suffocate.
It is required to oxidize fires. The specifics of each fire reaction will be detailed down below.
Oxygen is an invisible gas. To detect it, use your PDA or a wall mounted Air Alarm. Oxygen canisters are marked in blue. Emergency Oxygen Tanks, filled with about 300 kPa, spawn in your emergency Internals Box. Larger Oxygen Tanks are in Emergency Lockers all across ship, which start with about 600 kPa.
Export price per mol: 0.2 credits
 N2
N2
Our second base gas is Nitrogen. Not particularly more heat absorbant than any other gas. However, it cannot burn at all, which may slow down fires simply by taking up space. It can reduce the heat penalty on the SM, which will keep temperatures down.
Export price per mol: 0.1 credits
 Air
Air
A 1:4 gasmix of O2 and N2 (20% O2, 80% N2). The station is filled with this.
Air in SS13 can be seen, strangely enough, as a 'watered down'-O2, with N2 being the water. Optimal atmospheric pressure for humans is 101.3 kPa. Due to the minimum of 16 kPa of O2, the pressure of 101.3 kPa cannot be changed too much without the situation becoming excessively lethal. Under 16 % oxygen? You start dying. Under 90 kPa due to fire from a while ago? You start dying. Be mindful of this.
 CO2
CO2
The third gas available for atmosians from the start of a shift: Carbon Dioxide. What the fuck is Carbon Dioxide!? It's an invisible, heavy gas. It chokes people effectively and quickly, and if you can be bothered to set the alarms up, will result in a invisible room that kills those in it. Takes some setup and can be very, very annoying. Causes people to gasp at low levels. It is also often used to beef up the power generation of the Supermatter Crystal.
Export price per mol: 0.2 credits
 Plasma
Our fourth and the most infamous of the base gases: Plasma, a.k.a. Toxins. Plasma is purple, toxic, and flammable. When ignited in an oxygenated room it will produce fires.
Plasmafires use oxygen and plasma to produce heat and waste gas. Energy released from plasmafires depends on the burn rate for plasma. The plasma burn rate itself depends on the composition of the air and the temperature of the burn. Optimal composition for maximum burn rate is 10x more O2 than Plasma, with the air temperature exceeding the upper limit of 1643.15 Kelvins. Oxygen is burned at 0.4x the rate of plasma at temperatures above the upper limit. More oxygen (up to 1.4x the plasma burn rate) will be consumed for lower air temperatures.
The aforementioned waste gas of plasmafires are either solely tritium on oxygenated plasmafires (more detail on the tritium section below) or water vapor and CO2 on a 3 CO2 : 1 H2O ratio on non-oxygenated plasmafires.
Export price per mol: 2 credits
 N2O
N2O
The final base gas available in the atmos tanks: Nitrous Oxide, a.k.a. Sleeping Agent. A white-flecked gas.
Makes you laugh at low doses and at higher ones puts you to sleep. If using this as a sleep gas mix do not forget to mix in at least 16 kPa of O2, or you will suffocate someone. This decomposes into Nitrogen and Oxygen at temperatures at or over 1400K, creating Nitrogen equal to the amount of N2O used, and half that amount in Oxygen.
Export price per mol: 3 credits
 Tritium
Radioactive, flammable gas that is used in plenty of chemical reactions. Created by heating loadsa O2 with Plasma. Also, radiation collectors convert plasma into this. Tritium, though not naturally radioactive, releases radiation when it is burned. Might not want to put this into any engine unless you plan to set it on fire.
Tritium is created in fires that are super saturated, i.e. fires where there are 96 more units of oxygen than plasma. One popular ratio used by many Atmosians is 97 O2 : 3 Plasma, this wont hit the super saturation threshold from the get go, but given time the oxygen input will overflow the oxygen burn rate, resulting in a net positive oxygen gain in the chamber and eventually hitting the threshold. This oxygen accumulation continues over time, and therefore it is a good idea to lower the oxygen ratio in the burn mix over time. Another popular mix for chambers that have burned for quite some time is 85 O2 : 15 Plasma.
Important to remember is that tritium will likely be very hot when exiting the chamber, opening possibilites of cracked canisters and eventually toasted incinerators. Prepare accordingly! It is also worthy to note that tritium when allowed to react with oxygen will burn up into water vapor. Due to the chamber having a lot of oxygen, it is often a good idea to add a second scrubber to prevent too many tritium from being lost. Keep this in mind when attempting to get sizable amounts of it.
Tritium burns in a unique fashion. There are two ways tritium can burn, a very energetic high reaction rate burn and a slower one. The former is a key component to bomb making due to the insane pressure hop on the burn tick. The high burn rate occurs when there are more oxygen than tritium in a given mix AND if the total energy of the turf is above 2 million joules. If these requirements aren't met the burn reaction will revert to the slower one which wont be as theatrical as the first one.
Export price per mol: 5 credits
 Water Vapor
Pure H2O. Keep away from the Clown - this slips people and even freezes tiles when released at low temperatures.
The Janitor starts with a tank in his closet; created as a waste product on tritiumfires and unsaturated plasmafires.
Export price per mol: 0.5 credits
 H2
H2
Hydrogen is a flammable gas which when ignited burns similarly to tritium. It is also an integral part of fusion reactions. Hydrogen is made by electrolizing Water Vapor with an electrolyzer machine. Hydrogen is solidified in a reaction with BZ as catalyst at high heat and pressure (over 1e6 for both) to produce metal hydrogen ![]() , which can be used to make armor, a fireaxe
, which can be used to make armor, a fireaxe ![]() , and golems.
, and golems.
Export price per mol: 1 credits
 BZ
BZ
BZ gas is a potent hallucinogenic that also put slimes into stasis, degenerates changeling chemicals and supresses their hivemind. As a side effect, affected people will take low brain damage.
BZ is formed in an exothermic reaction when at least ten moles of each N2O and Plasma are combined at low pressures. The optimal pressure for this is 0.1 atmosphere, or about 10 kPa. Efficiency might be higher if you get it even lower somehow, though. Plasma is consumed at 2x the rate of N2O.
If mixed in a tank with oxygen, it can be used for internals, to encourage spiritual development. Breathing it also produces BZ Metabolites.
Export price per mol: 2 credits
 Pluoxium
A non-reactive Oxygen substitute that delivers eight times as much O2 to the bloodstream, with as little 3 kPa minimum pressure required for internals!
Formed by irradiating tiles with 2 part CO2 1 part O2 in the air in a cold environment (sub 200 Kelvins). The Supermatter can be used to naturally generate a small amount of pluoxium if CO2 is added to the cooling loop, but this is risky.
Pluoxium may also be created by exposing O2, CO2 and Tritium together in an exothermic reaction between 50 K and 273 K. This reaction creates a minimal amount of H2 (1% of Pluoxium created) as a byproduct. The consumption ratio for this reaction is 100 O2 : 50 CO2 : 1 Tritium.
Export price per mol: 5 credits
 Miasma
Miasma (bad air) is created from rotting corpses, gibs, and other things. Miasma smells bad and can cause diseases to spontaneously appear. The higher concentration of miasma in the air, the higher level symptoms can appear. Sterilized into oxygen in a slightly exothermic reaction at 170 degrees Celcius. Presence of water vapor in quantities higher than 0.1 moles prevents this from happening. This reaction has the lowest priority out of all reaction in the game. It is otherwise absolutely inert in terms of atmos reactions.
Export price per mol: 2 credits
 Nitryl (NO2)
Nitryl (formerly Brown Gas) speeds you up while causing lung damage. Nitryl is made by combining a minimum of 10 moles Oxygen, 10 moles Nitrogen and 5 moles BZ in a (slightly) endothermic reaction between 1500K and 10000K. The consumption ratio for the reaction is 20 N2 : 20 O2 : 1 BZ. Higher heat improves the rate of reaction.
Nitryl decomposes exothermically when in contact with Oxygen under 600K, splitting into a 1:1 mix of Nitrogen and Oxygen. Meaning you will have to experiment to find a way to breathe nitryl and not suffocate while doing so if you wish for speed.
Breathing nitryl in high concentrations will quickly cause lung failure, make sure that nitryl makes up a minority of your tank.
Export price per mol: 5 credits
 Freon
Freon
On temperature lower than 0°C (273.15 K) Freon will create an endothermic reaction with O2, meaning it will absorb heat from the atmosphere, down to a minimum close to 50K. Adding Proto-Nitrate will catalyse the reaction so that it may begin at temperatures up to 310 kelvin, which is above room temperature. This reaction produces CO2 and if the temperature is between 120-160K the reaction has a small chance to also produce solid sheets of hot ice ![]() .
.
Breathing freon causes burn damage.
Freon is made by combining a minimum of 40 moles Plasma, 20 moles CO2, and 20 moles BZ in a endothermic reaction at temperatures above 473.15 K. The consumption ratio for the reaction is 6 Plasma : 3 CO2 : 1 BZ. Higher heat improves the rate of reaction.
Export price per mol: 15 credits
 Hot Ice
Hot ice is a solid byproduct of the cooled Freon+O2 reaction at 120-160K. Can be sold to cargo at a high price. It holds a great amount of power inside. Can be ground to produce 25 units of Hot Ice Slush.
If hit with a welder or burned the hot ice will melt, releasing the power stored inside. This releases large amounts of hot plasma into the air. (Moles of plasma released = 150 x number of sheets) and (Heat released = 20 x number of sheets + 300K).
 Hyper-Noblium
Extremely inert, Hyper-Noblium stops other gases from reacting. (Specifically, it stops reactions when >5 moles and temp > 20 K)
Can be created when Nitrogen is combined with Tritium at extremely low temperatures (below 15 K). Reaction produces energy (exothermic) and BZ works to reduce the energy released. 2:1 Nitrogen to Tritium is about optimal here.
Export price per mol: 5 credits
 Proto-Nitrate
Proto-Nitrate is a highly reactive gas, but non-toxic when breathed. It is created in an exothermic reaction when Pluoxium is exposed to H2 at temperatures between 5000-10000 K. Hydrogen is consumed at around 10x the rate of Pluoxium.
When between temperatures of 250-300k, Proto-nitrate solidifies gaseous Plasma into bars
When between temperatures of 260-280k, Proto-nitrate reacts with BZ to cause localized hallucinations in an exothermic reaction
When between temperatures of 150-340k, Proto-nitrate reacts with tritium to produce H2
Proto-nitrate reacts with at least 150 moles of H2 to create more Proto-nitrate in an endothermic reaction
Export price per mol: 5 credits
 Halon
Halon
Halon acts as a fire suppressant by removing oxygen in the air (while producing CO2) in an endothermic reaction if the air temperature is above 100 C or 373.15 K. The oxygen suppresion rate is 20 O2 : 1 Halon. It is created by combining BZ and Tritium in an exothermic reaction between 30-55 K. Tritium is consumed at around 16x the rate of BZ.
Export price per mol: 9 credits
 Healium
Healium is a red gas which acts as a stronger sleeping agent than N20, while healing burns, bruises, suffocation and toxin damage. It is created by exposing Freon to BZ in an exothermic reaction at temperatures between 25-300 Kelvin (keep it chill). Freon is consumed at around 11x the rate of BZ.
Export price per mol: 19 credits
 Stimulum
An experimental gas that makes you stun and sleep immune and slightly regenerates stamina, but also causes toxin damage the longer you've been breathing it (current cycle x 0.1 toxin).
Formed by combining Tritium with Plasma, BZ, and Nitryl, then heating it above 1500 Kelvins. Exothermic and endothermic depending on a quintic formula governed by the temperature. Also formed in high quantities by fusion. Tritium and Nitryl gets consumed at a 1:1 ratio while producing Stimulum at 0.75 of the rate.
Export price per mol: 100 credits
 Zauker
Zauker is an incredibly deadly gas if inhaled. It is made by mixing Hyper-Noblium and Stimulum in an endothermic reaction at temperatures between 50000-75000 K. Stimulum is consumed at around 50x the rate of Hyper-Noblium. It is worthy to note that Noblium stops reactions when it is present in quantities above 5 moles, prepare accordingly!
Zauker also decomposes exothermically into a 30/70 O2/N2 mix when exposed to Nitrogen.
Export price per mol: 100 credits
 Anti-Noblium
Anti-Noblium is a rare gas used in high level Crystallizer recipes and as high tier fuel for the Hyper-torus Fusion Reactor. Outside of those uses, it doesn't do all that much. It does look pretty when in the air though!
Anti-Noblium can only be made within the Hyper-torus Fusion Reactor when using Hyper-Noblium as the primary fuel with either Hydrogen or Tritium as the secondary fuel.
Export price per mol: 10 credits
Physical Characteristics of Gases
TL;DR Gas flows from high pressure areas, to low pressure areas. Gas uses up more room when hot, less room when cold.
Ideal gas law: PV = nRT
Where R (ideal, or universal, gas constant) = 8.31, the following are linked by this equation.
Pressure (P): Measured in kPa, kiloPascals, Pressure is lethal above 750 kPa's. A pressure in a room above 1000 kPa's necessitates internals to breathe properly.
Volume (V): Another unseen variable, Volume is how much the area/canister/tank or piped tank has space inside it. This helps dictate how much gas it can hold. Volume is essentially the 'mole divider' when converting between a canister/air pump to your tank; having a higher volume essentially makes the tank that much more efficient, proportionally, so an Extended Emergency Oxygen Tank has twice the contained air per kPa in comparison to a regular Emergency Oxygen Tank.
Moles (n): Moles are the amount of particles of a gas in the air. It is moles that cause odd effects with a certain chemical. As it dumps so many moles to a tile, to keep the pressure acceptable, the moles have to be very, very cold, causing the infectious effect. Moles can be calculated by a form of the ideal gas law. n=(P*V)/(R*T)
Temperature (T): Measures in K, Kelvin, Temperature above 360 K and below 260 K causes burn damage to humans. Canisters rupture when the air surrounding them is over 1550 K.
Heat Capacity: A gasmix has heat capacity, and it is calculated by taking into account the quantity of all of the gases in the air and their specific heat. Heat capacity defines how much energy it takes to raise the temperature of a gas. The normal air mix (%30 O2, %70 N2) has a specific heat capacity of about 20 which doesn't impede heat transfer very much. Fires spreads quicker in gases with low heat capacity, and slower in gases with high heat capacity.
| Gas | Specific heat capacity (molar) |
|---|---|
| O2 | 20 |
| N2 | 20 |
| CO2 | 30 |
| N2O | 40 |
| Plasma | 200 |
| Tritium | 10 |
| Water Vapor | 40 |
| Hydrogen | 15 |
| BZ | 20 |
| Pluoxium | 80 |
| Miasma | 20 |
| Nitryl | 20 |
| Freon | 600 |
| Hypernoblium | 2000 |
| Proto-Nitrate | 30 |
| Halon | 175 |
| Healium | 10 |
| Stimulum | 5 |
| Zauker | 350 |
Fire: An effect caused by the ignition of plasma, tritium, and hydrogen in an oxygenated room. It causes massive burn damage, and raises the temperature of the room.
In short the colder the gas and the higher the container volume, the more moles you can fit inside. This is why hot gases clog the red waste pipes - they expand, allowing fewer moles to be transported.
Optimizing Internals
- On a basic view, a 16 kPa minimum O2 requirement in internals. Pure O2 is theoretically toxic in real life, but has no representation for this in code, and takes a while to be really dangerous anyway (they use it to treat certain diseases, for example), and thus using a tank filled with air for internals is fairly inefficient.
- Cold O2 has more moles per kPa, and because people breathe in moles, and filling tanks usefully for internals are largely capped by the 1000 kPa release pressure, means cooling your O2 before using it in internals is important! Cooled down O2, such as from a freezer-ed canister, is the most efficient way to set up internals. Cooling it below 264 K will result in icicles inside in your lungs, though!
- If you need to empty an internal tank to make space for better, colder O2, you can use an Air Pump. Set it to "pump in" and "turn on" then "off" with the tank inside it, making it completely empty, thus allowing you to refill the tank more effectively.
- An emergency oxygen tank with normal settings lasts for about 12 minutes. Same tank, but with optimized gas temperature and output settings reduced, lasts about 50 minutes. If you don't have resources to get cooled O2 right now, set your output pressure to 16 kPa, it will give you 31 % more time to breathe.
Thermomachines
Combined entity of freezer and heaters, thermomachines allow you to influence the temperatures of gases connected to it. Thermomachines have two ports: a green coloured target port and a red coloured reservoir port. On heating mode, the reservoir serves no function while the target port heats gases up to a set target temperature. On cooling mode, the heat from the target port is being transferred to the reservoir until the target port reaches a set target temperature. The larger the temperature difference between the target port and reservoir port is, the less cooling efficiency you have.
An ideal thermomachine working at full efficiency "combines" the gas mixture actually present inside it with a gas mixture of a set temperature (depending on the user input) and heat capacity (depending on the quality of matter bins present). A heater will always work under the aforementioned ideal circumstances, while a cooler can get throttled down to a minimum of 65% efficiency. Thermomachines on cooling mode also suffer from several thousand joules of motor heat added to the heat reservoir every tick, do keep this in mind.
Thermomachines need to have gas present inside it to properly cool or heat. On heating mode, the target port needs to be filled, while on cooling mode, both the target and reservoir ports need to be filled.
Fusion
So you want to operate a fusion reactor? Well, it's about as dangerous as it sounds. On /tg/station, fusion has been redesigned several times and is currently on version 7: "Hypertorus Fusion Reactor (HFR)"-edition.
In version 7 of fusion, you must build a machine called Hypertorus Fusion Reactor.
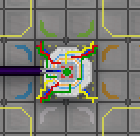
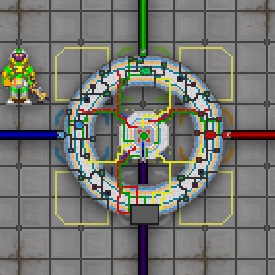
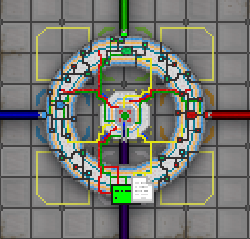
The HFR is a 3x3 multi machine that needs the proper setup to be built. In most maps you'll find a proper space with outlines on the floor to designate where to put each piece.
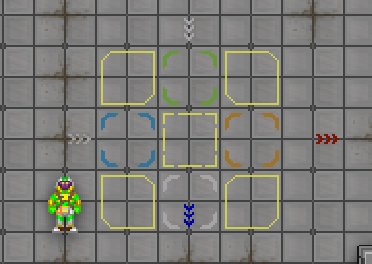
Click expand to see the how to build the HFR.
First thing first, you need to build the core of the machine. This piece has ONE port that is used for cooling the internal fusion mix, you can rotate the machine simply by using a screwdriver and a wrench (similar to how you rotate a freezer/heater)
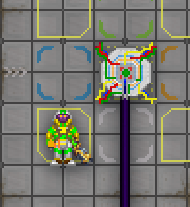
after the core is done, build the 4 corner pieces in the corners of the grid and the 4 ports for fuel, moderator gases, waste and interface.
The result should be something that looks like this:
finalize it by hitting the interface with a multitool
A little piece of paper will show up, it contains tips on how to operate the machine that you won't find here, so read it carefully!
Now that you know how to build it, let's see what all those buttons do by starting from opening the interface.
Click expand to see how to operate the HFR Interface.
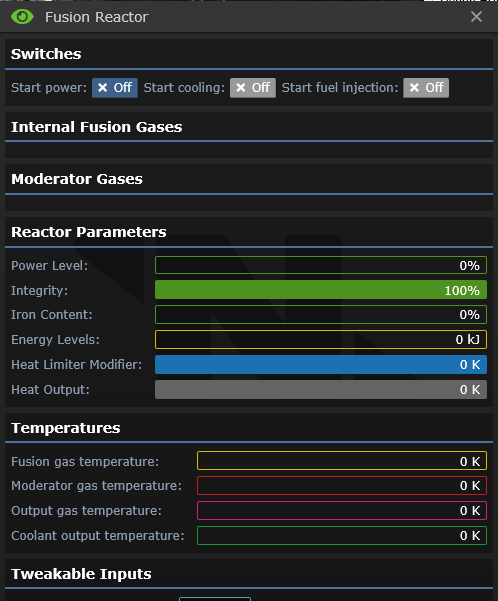
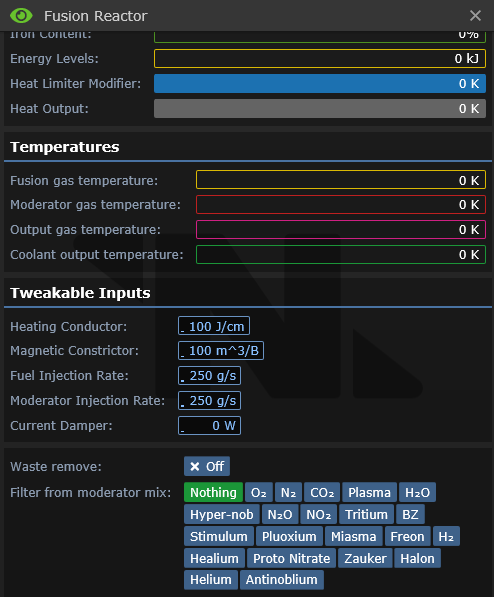
The interface it’s quite big and it has an overwhelming amount of informations but we’ll go through them one by one (you can also scroll to access all infos)
Those are the main controls, they control how the machine will behave
-Start Power starts the machine main loop and allow power drain and activates the other controls
-Start cooling starts the machine cooling loop, the one connected to the core
-Start fuel injection starts the fuel injection in the machine which will start the main fusion loop and thus starting the reaction itself
This will contain the gas mixture of the fusion gases and the moderator gases
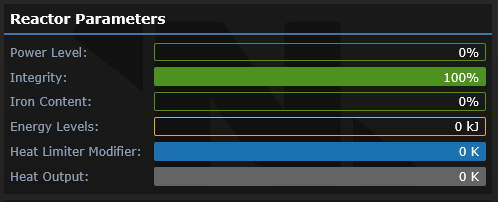
Those are the main parameters of the fusion reactor
-Power level goes from 0 to 600, from it depends the amount of power consumption (from 50 KW at PW 0 to 350 KW (it will be higher in the future)), the volume of the noise the machine makes, the damage the machine will take, the ability to turn off the machine safely (at high power level you can’t), fuel consumption, various other gas reaction/interactions.
-Integrity indicates the integrity of the magnetic containment field inside the machine, if it reaches 0 the machine will explode, is controlled by how many moles of gas are inside the fusion gasmix and their temperature and by other factors.
-Iron content is the amount of iron being produced inside the reactor, at high amounts will actively lower the integrity by damaging the fields, can be lowered by lowering the fusion temperature.
-Energy levels depends on the amount of moles inside, the kind of gas inside and the moderators too will have different impact.
-Heat limiter modifier will change depending on the power level, will limit the amount of heat the fusion can increase/decrease each tick (hotter gases are easier to heat up/cool down)
-Heat output is the main parameter affecting the temperature of the fusion reaction, is limited by the Heat limiter modifier and is affected by many other factors.
Those will show the gases temperature in real time
The flow of heat is Fusion > Moderator > coolant
(output gas will have either moderator or fusion temperature depending on the source)
If you don’t add a moderator the heat will go directly from the fusion to the coolant, but is much more inefficient.
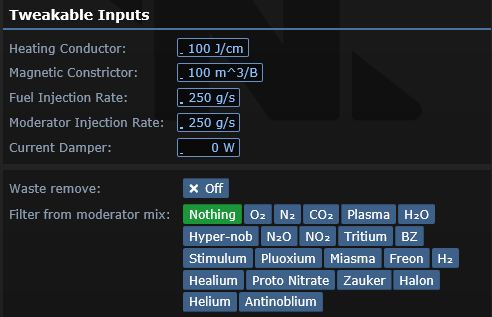
Those are inputs that the user can change
-Heating Conductor will change the Heat limiter modifier, higher numbers means higher heat transfer. The Heat limiter modifier will affect the Heat Output by increasing/decreasing the maximum range possible; keep it at 100 for normal operations.
-Magnetic Constrictor will actively change the volume inside the fusion reactor, this affect instability and power output. Increasing the number will increase the volume available to the fusion gases, allows higher instability fluctuations and increases the influence of every gas inside the machine (positive and negative influences). Keep at 100 for normal operations.
-Fuel and moderator injection rate will change how much gas will enter the machine this affect consumption, and other gas related interactions
-Current Damper, life saver, will actively increase the instability of the fusion reaction making the reaction endothermic, that can set the heat output to negative cooling down the fusion mix, useful in meltdown situations. Counteracted by iron content.
-Waste remove will start to output helium/antinoblium at a fixed rate from the fusion mix and the gas you set to filter from the moderator mix allowing the user to filter out specific gases from the moderators
And now let's learn what each gases will do inside the machine
Click expand to see the HFR gas interaction section.
First thing to learn is the fuel: only a mixture of Tritium and Hydrogen will enter the fuel input port, no other gases will go inside (at least for now)
The moderator gases are special gases that have a double function, first they allow proper cooling for the core, second they have interactions with the functioning of the fusion reaction itself, those interactions are:
-for the fusion gasmix:
--Hydrogen = increase the energy of the system and increase the heat modifier
--Tritium = increase the energy of the system and increase the power modifier
--Helium = decrease the energy of the system, increase the heat modifier and increase the radiation modifier
-for the moderator gasmix:
--Nitrogen = increase the energy of the system, decrease the heat modifier and decrease the radiation modifier
--CO2 = increase the energy of the system and increase the power modifier
--N2O = increase the energy of the system and decrease the heat modifier
--Zauker = increase the energy of the system and increase the power modifier
--Antinoblium = vastly increase the energy of the system and vastly increase the radiation modifier
--Hypernoblium = vastly decrease the energy of the system
--H2O = decrease the energy of the system
--NO2 = decrease the energy of the system and increase the power of the system
--Healium = decrease the energy of the system
--Freon = decrease the energy of the system, decrease the power modifier, decrease the heat modifier and decrease the radiation modifier
--Oxygen = decrease the power modifier
--Plasma = increase the power modifier, increase the heat modifier and increase the radiation modifier
Now you know how to build and operate the HFR - Hypertorus fusion reactor! Many other informations and tips are provided in game in the proper pamphlet after activating the machine, enjoy!
You can no longer make fusion in gas canisters or open turfs (mostly due to performance issues). Old guides below.
Click expand to see the old outdated version 6: "Chaos Hyper-Torus Edition".
The quick guide to make fusion in version 6 is:
- Mix at least 250 mols of
CO2H2, at least 250 mols of plasma and a "good amount" of tritium. Then heat it all to over 10000K. - Many gases have a "fusion power" stat that may affect a fusion reaction when present. You can find this stat by looking directly in the "code".
For a more detailed description of how fusion works and what you can create with it, you may need to try to understand the pull request that last changed it (as of April 2020) combined with the "original pull request", or find other sources.
Click expand to see the old outdated version 5: "Power Tiered" fusion system.
Fusion occurs when you give plasma and tritium a lot of heat energy. It'll quickly convert all of the gases to an extremely hot mixture based on the power of the reacting mixture. This power can be increased or decreased depending on what exactly is in the mix. The ratio of plasma is kept at exactly half of the mix for higher power and the rest of the gas, the mediation gas, should have a high fusion power and a low average specific heat.
Gas fusion power: Each gas has a different amount of power it can contribute to the fusion process per mole, typically the rarer it is the stronger it will be. If it isnt listed here, it doesn't provide any power to the equation but can still be used to lower the average heat capacity or required temperature.
| Gas | Fusion power |
|---|---|
| CO2 | 1.25 |
| Water Vapor | 8 |
| Nitryl | 16 |
| BZ | 8 |
| Stimulum | 7 |
| Pluxonium | 10 |
Power ratio formula: When fusion occurs and plasma is exactly half of the mix, the following formula is used to find the tier of the fusion:
If plasma is not half of the mix, it will begin a bell curve decay in the power ratio.
Required Temperature: 3e9 joules must exist in the mix for the fusion to occur
Power tier Depending on the power you create from the mixture, fusion can go into 4 different tiers scaling to have typically higher rarity in produced gas, energy produced, and dangerous side effects such as radiation bolts, lingering radiation, tesla shocks, and an explosion. A portion of the gas is converted to raw energy, growing depending on tier.
- Low tier:
- 0-5 power ratio
- Low chance of explosion and short range shock
- Produces 10% BZ and 90% CO2 with a high enough heat to make a tiny amount of hyper noblium
- Medium tier:
- 5-20 power ratio
- Moderate chance of explosion and medium range shock
- Produces 25% Nitryl and 75% N2O with a high enough heat to make several hyper noblium bombs
- High tier:
- 20-50 power ratio
- High chance of explosion and wide range shock
- Produces 1/12th Stimulum and 11/12th pluxonium with a large amount of heat
- Super tier:
- 50+ power ratio
- 100% chance of explosion and very wide range shock
- Produces 100% Tritium with a massive amount of heat
Example
Since fusion tends to be a little difficult for people to find entry to, a sample for doing so will be provided here.
- mix: 5000 moles of trit, 5000 moles of plasma.
- Average mediation specific heat: 10
- Average mediation fusion power: 1
- Mediation mole count: 5000
- Fusion power:(5000*1)/(10*80) = 6.25 = medium tier
- Required heat: (3e9)/((average specific heat)(total moles)) = 2857.14 k
Tips for working with fusion:
- at the highest efficiency roughly 30% of the gas you use will be lost to the pump to the canister and to the heat exchanger to the can so prepare accordingly.
- Work with friends. It has high setup and maintenance requirements, and your fellow atmos techs, engineers and toxins scientists are all valuable resources in your pursuit of very hot things.
- Although some gases may have high fusion power they might have too high specific heats to give you the tier you want, as a rule of thumb Stimulum, Nitryl, and BZ are all very useful for reaching higher tiers of fusion.
- Fusion requires Heat energy not Temperature meaning the more moles you can fit into an area, the lower the temp is for you to start fusion.
- It is recommended to have a sacrificial lamb preform the finale in an unused area such as space, if not be wearing radiation protection and have an excuse for the gods you are about to anger.
- It is intended to preform fusion in a canister but doing it in a pipe net or incinerator is possible.
- Heat exchanges are your friend for starting your reaction. Connect it to tritium burn chamber or canister to get the heat needed to start it.
- Typically gases with high power but also high specific heats like water vapor or pluxonium will become exponentially more efficient the more you use due to the average specific heat increasing less and less the more you use.
- Should you want to release a canister that you used for fusion in a room full of people, consider shooting it to break it open so you arent right next to it.
Beyond the basics:
- You can harness the radiation produced from fusion to produce power using rad collectors. Earn your keep as a member of engineering. Or just use it for pluoxium production.
- The higher the temperature, the prettier the fire. See if you can get the prettiest color fire.
- Traitors can harness fusion reactions to devastating results if done correctly.
Crystalizer
The Crystallizer is a machine that allows gases to be solidified and made into various materials. It currently supports the production of:
| Item | Properties |
|---|---|
| Metallic Hydrogen | A crafting material used for golems, axes, or an armor. |
| Healium Crystal/Grenade | A grenade that can cool down, refill a room with nitrogen, and scrubs some amount of plasma from the air. It also deals stamina damage to mobs nearby. Good for firefighting. |
| Proto-Nitrate Crystal/Grenade | A grenade that can refill a room with nitrogen and oxygen with a 8:3 split respectively. |
| Nitrous Oxide Crystal/Grenade | A grenade that will release Nitrous Oxide (Laughing Gas). |
| Hot Ice | A material normally prodouced by freon combustion, also craftable with the Crystallizer. When weldered or burnt, it rapidly releases a very hot and dense cloud of plasma gas. |
| Ammonia Crystal | A material with not much use except for exporting. |
| Supermatter Shard | A smaller version of the extremely dangerous Supermatter Crystal used for power generation. |
| Diamond | A sheet of diamond. Many crafting and manufacturing applications. Used thorough the station. |
| Plasma Sheet | A sheet of plasma. Many crafting, manufacturing, and biological applications. Used thorough the station. |
| Crystal Cell | A non rechargeable cell with a huge power capacity. Rated at 50 MJ. |
| Zaukerite | A material without much use except for bragging rights. |
| Fuel Cells | Fuel cells used for drone explorations. Comes in three qualities denoting the difficulty of gases used. |
The working principle and gaseous requirements behind the crystallizer is rather simple and explained in the machine itself. You select a recipe, pump gases in using the input (green) port, meet the temperature requirements, and wait for the material to finish crafting. The red port is used for heat control, as it will conduct with the internal mix and influence the temperature. You have a 10% wiggle room for the temperature requirements, but straying too far from the optimal temperature will influence the final quality of the item produced.
Bluespace Gas Vendor
This is the hub for gas purchase done by the crew. You only need to pipe your gas in and it will distribute it across vendors available station-wide. You can also set a price per mole for the gases. The gas will be at 20 degrees Celcius and is capped at 1013 kPa when purchased by the crew, do keep this in mind. You can also refill the individual vendors with metal for it to make more tanks.
After the Work is Done
This is a section dedicated to various tips and tricks, trivia, and things that you could do in your spare time:
- First and by far most important: make sure pipes don't get broken and if they do, fix them.
- Go around swiping your ID on Air Alarms, setting the operating mode to contaminated, and then re-swiping to lock it. You can ask the AI to do this as well, and probably should.
- Fill all the air pumps with air using a volume pump, these work until 9000 kPa compared to the pressure pump's 4500.
- Go to the red lockers, get a hard hat, gas mask and everything else that might be of use. Remember that you need both a fire suit and a hard hat to be resistant to weak fires. One will be useless without the other.
- Go grab the Fire Axe from the wall mount and hide it somewhere so the chucklefucks won't get it and go killing. DON'T take it with you and go walking through the hallways trying to look like a badass, you'll be the prime target of any antagonist/griffon who needs an efficient weapon.
- Least importantly, maintain the disposals system. You can generate pipes, but it needs welding and is generally a pain in the ass. You can also make fun slides, though.
- Using H/E pipes in space you can cool things down to a very low temperature very quickly. By making a cross with two off them you can have two on
- Gas pumps are for precise pressure control, volumetric pumps are for really fast pumping, and passive gates are for having 'one way' manual valves.
- Extremely high-temperature gases (like those from a panic siphoned fire) can really clog the waste loop. Could you do something to correct that?
- No one uses the ports outside of the 'refilling' station, but that doesn't mean that functionality can't be added onto them!
- The wall section that looks like the letter 'I' can be dismantled if you need more working space for pipes.
- Don't count out the grated window areas, they can be a great (har har) way to utilize the vacuum of space without an EVA suit.
- Speaking of EVA suits, your engineering buddies can potentially help you with anything you might want to do in space, be it adding or modifying pipes. Watch the hilarity as that incompetent engineer fumbles when setting up a heat exchanger pipe loop!
- The mining station doesn't have air recycling. Very long rounds might make this a problem for any miners working there.
- Any gas at pressure over 1000 kPa will cause you to start suffocating as in a vacuum. You can just use internals, though.
- N2O is invisible at low pressures. If you start giggling, put on your internals to avoid passing out.
- Any gas can displace O2, and less than 16 (also useful for optimizing internals) kPa of oxygen starts the Oxyloss. CO2 can be removed with the scrubbers, but to get rid of N2 simply apply some way of removing gas from the air and adding O2. My personal favorite is 2 air pumps, 3 connectors and an Air Filter and a canister: 1 pump draws in, goes through the connection and filters N2 into the canister, and the rest to the other pump, which expels it. Can also be used for N2O which is only sluggishly scrubbed otherwise.
- Pressures above 750 kPa do 10 DPS + 5 DPS for every extra 375 kPa above that mark, rounded off. Space suits completely block it all, but there is no other defense.
Atmospherics 301: Pipeline and Pipenet Theory; LINDA: Active Turfs & Excited Groups; Superconduction
LINDA? What is LINDA? LINDA is our atmospherics system. There are various theories on the origin of this name, but that is not why we are here. We are here to understand how gas dissipate, how pipelines and eventually pipenets are formed, and the more technical parts of atmospherics.
For a technical and detailed breakdown of our atmospherics subsystem and how everything works, refer to https://github.com/tgstation/tgstation/blob/master/code/modules/atmospherics/Atmospherics.md
This will be an abridged version of that guide, intended for those without any experience in codediving. This not a substitute for that guide however, and we highly implore you to visit the documentation, even if you don't have any experience in reading code-heavy documentations.
We will use the supermatter and various figures as scenarios, this guide is best read once you know the basics of how supermatter works and have read the guide.
Pipeline and Pipenet Theory
If there is one part of Atmospherics 301 that you should read, this is it.
Our atmospherics susbystem does not simulate flow. Every interlinked pipe is connected into a single pipeline, and every pipeline member is subject to gas sharing. That is to say that when you use your Analyzer on a single pipe, what you are seeing is the gas mixture of the pipeline (this returned gas mixture information doesn't include gas inside of machineries like pumps, only the regular pipes, but they are considered as extra member of the pipeline and are subject to the same gas sharing rules.)
(Extra note: in the code, we store gas information for each calculated atmospheric entity in datums called gas mixtures, this is important terminology right here, but you don't need to worry too much about this.)
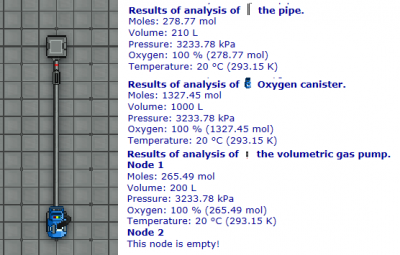
Each pipeline have a gas mixture, each individual member of the pipeline gets a share of this big gas mixture based on how much their share of the total volume is. Lets take the picture on figure 3.2 as an example. Notice that the pressure is preserved on all the analyzed machineries, demonstrating that once again: the gas is being shared equally between all of them based on their respective volume. This is what the supermatter guide refers to as gas directly appearing in the two ends of the pipeline as wide as the observable universe. Keep this concept of gas sharing in mind!
Most atmospheric devices perform actions only the gas directly under their influence; the gas that are directly present in their system. You can take a look back at the volume pump in figure 3.2, the volume pump will only move the gas directly inside their gas mixture. This is why taking gas out of the huge distribution loop is tedious and long, this is why some supermatter setups will lack moles directly inside the chamber if you expand the cooling space loop too much, this is why thermomachines are less reliable on very huge pipe networks.
Layer manifolds and valves connect different pipelines together by doing gas redistribution. Pumps however, does not. They have two gas mixtures that when connected, will be part of two separate pipelines. These pipelines will not interact with one another, but the gas will be allowed to move in one direction when the pump is turned on. You can imagine these with cups of water and salt being mixed in various forms and being put sideways; valves and manifolds combine both the cups by gluing it, while pumps work by adding a filter paper and only allowing water to flow into the salt cup and not in the reverse direction. This is why the supermatter guide goes into length on removing pumps, because they are only there to restrict flow and create pressure gradients, not to mention how they are prone to clogging.
We go into great lengths in explaining pipelines and pipenets because it is very important and will show up again and again in your journey as an atmospheric technician. Now buckle up for a shorter exposition of environmental atmospherics!
LINDA: Active Turfs and Excited Groups
Our atmospherics system: LINDA, work based of concepts of active turfs and excited groups. A turf (tile) will become active when any gas changes happen, be it a plasma canister being opened, a breach occuring, or as simple as scrubber taking CO2 out. A turf will also become activated if a wall is deconstructed, necessitating it to be filled. These active turfs will combine into an excited group and equalize every several iteration of the subsystem ticking. This is LINDA in it's simplest, most abridged form.
Superconduction
On high temperatures (above 100 degrees Celcius), superconduction occurs. Superconduction allows heat to transfer between closed turfs, it is what allows glass to break on plasma fires, and why windows are really bad insulators. In short, superconduction is the interface between the turf and the gas mixtures. You will not need to understand the inner workings of this phenomenon during your course as a technician, but keep in mind of it's effects.
There is however, one exception: super hot turf based fires (incinerator springs to mind) As previously stated, superconduction is the interface between the turf level and the gas mixtures, the turfs are initialized at 20 degrees celcius and with a heat capacity of, well, practically infinite. This means that on every single instance of your gas mixture being hotter than 100 degrees celcius, it is sharing with the 20 degree celcius turf (losing heat, or why canisters fires are hotter than incinerator). This presents an extra challange for you, our dearest technician, in making very hot fires.
Being a Traitorous Scum
Or: How to get the AI lynched; How to call the shuttle as Atmos Tech, step-by-step:
- Open valves connected to harmful gas you want to add to the station.
- Set pumps to the distribution loop to maximum pressure output (4500 kPa).
- Set filters to not filter harmful gasses you want to add to the station OR set the waste-in pump to 0 kPa (but leave it on to confuse the crew).
- Open valve from custom mix chamber.
- Turn on pump leading to distribution loop.
- Wait for vents to slowly kick out your deathgas mix as regular atmos drains out through the inevitable hull breaches (alternatively turn off pressure checks on air alarms' vents to speed things up).
- If you need to kill someone for your objective, and you want to be more proactive, the Fire Axe mounted in the wall is surprisingly effective. Just don't leave it lying around, because it's one of only two on the station.
To hurry this process up, you can set the air vents at local control panels to maximum output pressure. Not doing so gives the AI and Atmos Techs more time to notice what you've done and shut it off before it takes effect.
A faster process for achieving the same result is to do the following:
- Disconnect, change the direction of, and reconnect the pump that feeds from the air mix to the mix tank in the north-eastern room of atmosia.
- Open the valves for your deathgas mixture of choice.
- Power on and max the pressure on every pump in the mix pipes (yellow pipes) from the storage tanks out to the station output (blue pipes).
This simply means that instead of the air mix being put into the mix tank as it normally does, the air mix (which may or may not contain death gasses) is fed into the station output.
Crafty atmos traitors will want to cut cameras, replace pumps with pipes, use tricky pipe configurations to avoid the AI interfering or the detective trying to fix it and make a hole in the station's oxygen and air tanks, venting the entire round's supply of oxygen into space.
An extremely fast method that involves a clever use of the waste system is the following:
- Reconfigure the piping to connect the waste system directly into the pure pipes.
- Find a place with a waste pipe next to a distro pipe, then configure them so that they can be united later.
- Open the valves for your deathgas mixture of choice, the waste piping should now begin to fill with your gases.
- Set as many air alarms as you can to have every vent at Internal 0.
- When ready, go back to your distro/waste pipe spot and unite them.
- Listen to screams over the radio.
Other antagonistic things to do:
- You can hack an air alarm to use it as a non-Atmos Tech.
- You can C4 the digital valves to let you remove them and shut down AI control, or save a C4 and disable the cameras if you know there are no Cyborgs on the station.
- Using a gas filter turned on to pour large, ever increasing, amounts of gas onto a single connector port has no visible effects, but if you wrench a canister onto it then the canister will almost immediately fill up with the massive pressure buildup, letting you get super-high pressure plasma/CO2/etc canisters to hit area's with.
