Руководство по токсинам
| Директор Исследований Роберт Оппенгеймер говорит: «Вот, подержи эту бомбу. Просто имей в виду, что я не несу прямой ответственности за любые массовые разрушения, которые могут быть вызваны или не вызваны вашими действиями.» |
Токсины являются частью департамента РнД. Когда - то было время, когда разработка токсинов свидетельствовало о том, что вы являетесь плохим парнем, но с появлением исследовательских бомб это больше не так.* Теперь, если вы отлично делаете бомбы и применяете их в правильном русле - вы получаете похвалу от коллег и активированные ядра.
*обратите внимание, что после первой исследовательской бомбы оставшаяся смесь бомб применяется только для активации ядер с помощью Implosion Compressor, или для более гнусных целей (или очень неэффективной, но веселой добычи лаваленда).

 Газовая смесь для бомб
Основная цель токсинов - создание газовой смести, при смешивании которой происходит большой взрыв. При симуляции взрыва в Implosion Compressor при правильном соотношении взрыва можно получить активированное ядро.
Introduction
Токсинная бомба состоит из двух резервуаров с газом, скрепленные вместе tank transfer valve. Для готовой токсинной бомбы нужно будет заполнить один из этих резервуаров смесью переохлажденного кислорода и трития (33% трития и 66% кислорода при температуре около 43К), для упрощения нужно заполнить пустой кислородный баллон до 850 KPA(включительно) холодным тритием и все оставшейся пространство в баллоне холодным кислородом под максимум. Вторую, горячую часть нужно заполнить перегретой плазмой(температурой от 5000 - 32000К). При таком соотношении можно получить макскап бомбу.
Тритий синтезируется, когда Плазма сгорает в насыщенной кислороднойсреде, обычно около 3%-97%. В общей сложности мы сожжем в камере лаборатории токсинов три из четырех кислородных баллонов(при отсутствии большого танка с кислородом), с которых начнем, а затем медленно добавим плазму и подожжем ее. Горячие газы занимают много места, поэтому мы захотим охладить тритий сразу после его создания, чтобы уменьшить его объем и помочь нам его сохранить как можно больше. (Также если вы не сделаете это то вы вероятно расплавитесь как этот чувак.) Все инструменты ,которые вам понадобятся для эксперимента будут находиться в лаборатории токсинов: ключ, отвертка, ломик, Аналайзер и RPD. При прокладке трубопроводов с помощью RPD не забывайте по возможности избегать использования серых труб, так как они автоматически соединяются с любой другой цветной трубой. К тому же цвет труб поможет вам легче ориентироваться в вашей схеме .
Установка труб
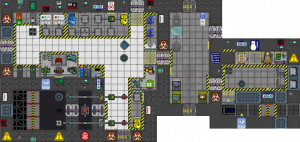
Для того, чтобы у нас получился тритий нам нужно будет переделать несколько труб, добавить еще два скарббера в камеру сгорания, сделать холодильник и подачу плазмы вместе(он же и забор кислорода для холодной части).
Чтобы преступить к работе вам нужно будет взломать две двери и снять с них болты(ии вам не поможет, он не видит те двери). Однако, если вы не горите желанием взламывать двери - возьмите пожарный костюм, включая шлем с маской, чтобы вас не убило отсутствие давления и при помощи кнопок внутри камеры сгорания установите два(опционально)дополнительных скрабберов. Чем больше скрабберов вы установите - тем больше трития вы получите, большее количество скрабберов позволяет его собирать намного эффективнее, который вы можете собрать до того, как тритий сгорит с образованием C02 и водяного пара. После установки вы можете снять пожарный костюм, я надеюсь, что он вам больше не понадобится.
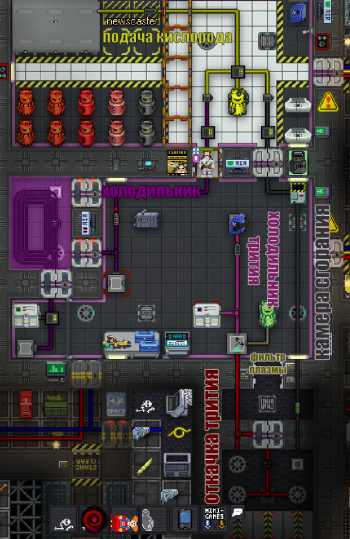
Начнем с желтой части, видите большой танк, он же omni gas presure tank? Выкрутите все газ миксеры и порты и поставьте вместо них трубу и gas volume pump, а также порт. К порту прикрутите пустую канистру и наберите ее полностью кислородом. После наполнения открутите канистру, оттяните канистру к холодильнику и на специальном порту прикрутите канистру, поставив охладитель на 43К, пока вы будете заниматься остальными делами, кислород будет охлаждаться. После этих манипуляций вернитесь обратно к желтой трубе и откройте желто - черный кран, таким образом вы пустите кислород дальше по трубе, следуя по трубе вы найдете gas pump, укажите в ней максимальный выход(то есть 4500КPa). Рядом с нами есть красная труба, устанавливаем рядом с выходом серый gas filter, выбираем там plasma и включаем его, от фильтра плазмы вбок ставим трубу и connector. Прикручиваем пустую канистру и включаем обязательно щиты(иначе от горячей плазмы вы взлетите на воздух из за взрыва). С другой стороны ставим 3 трубы, один gas volume pump, connector и холодильник, выставив его на 43К, и прикручиваем Portable Pump. Таким образом у нас в трубе будет скапливаться холодный тритий, до завершения ваших опытов не включайте помпу. газ имеет способность отдавать тепло, без постоянного поддержания температуры.
Thermomachine Setup
To reach our target temperature of about 43.15 Kelvin, we're going to need to upgrade our Thermomachines with Tier 2 Lasers, which should by now be available from the Science Protolathe in Research and Development. If not, consider liberal application of a Toolbox to your fellow scientists heads, and/or research Industrial Engineering yourself and print 4 of them. You can also use a Rapid Part Exchange Device (RPED) to install them quicker.
Next, head back to your den and the unsecure one of the Thermomachines (screwdriver to open the panel, then right click with a wrench), and position it so it connects to your output pipes just below the pump you installed. Upgrade this Thermomachine either by using a RPED or by dismantling and rebuilding it with the new lasers. Upgrade the other Thermomachine, too. In both cases, use your new lasers rather than the ones that pop out of the machine when you crowbar it. Turn both Thermomachines to 'Cooling' and set the temperature to 43.15 Kelvin, then turn them on.
Since Thermomachines on Cooling mode are basically deluxe heat transfer pumps, you need to connect the output (red) end of the machine to something to dump the heat from the hot tritium coming out of the mix chamber elsewhere. Thankfully, it's easy to connect the machine's output to the station's red waste pipe loop. Set your pipe color to red and place a Layer Adapter next to the Thermomachine's output (the one you are using to cool the mix chamber output pipe). Either use a T-Ray Scanner or rip up some floor tiles to locate the station's red waste loop in the lab, and place more red pipes on layer 2 until you get a connection.
Note: Sometimes the Thermomachines fail to properly cool down to the desired temperature. If you find you can't the tritium to cool down enough, you may have to research Tier 3 Lasers to reach 43.15k. These will require two extra technologies and cost some uranium, so you better hope the shaft miners decided to come back alive with some before running off to become a Monster Hunter.
Now for the last bit of prep. The blue Portable Pumps found in Toxins Storage can cram more gas into the gas tanks we use for the bomb just like the T2 canister; lets use it for our super cooled oxygen. Take your fourth and last Oxygen canister, wrench it to the right side of the gas filter setup in the room, take one of the Portable Pumps and wrench it to the other side and turn the filter on without actually filtering anything. Once done, all of the oxygen should have moved from the canister into the portable pump. Unwrench the pump and bring it over to the second Thermomachine. Wrench it into the directly adjacent connector port, and ensure the Thermomachine is on and set to 'Cooling' at 43.15 k. The portable pump is now filled with chilled oxygen ready for our bomb mix.
Ignition and Tritium Production
At this point, you should have three full canisters worth of Oxygen in the Toxins Mix Chamber, and your setup should look something like the image on the right. If you've made it this far without any issue, great work! We have the cooled oxygen, now we just need the chilled tritium and the super heated plasma. Let's get onto the dangerous stuff now.
Start by going into the airlock and set the input pressure pump to 50 kPA. This sets a slow rate of input to trickle in plasma as fuel for the soon to be roaring fire.
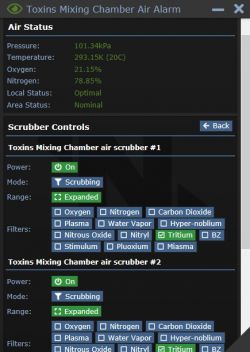
Next, we need to program the scrubbers to actually scrub out the tritium we want, while leaving the waste gases we don't want behind. Open the interface of the Toxins Mix Chamber Air Alarm next to the interior airlock by left clicking on it. Select 'Scrubbers' to display a list of all scrubbers in the mix chamber. For each one, set the range to 'Extended' and scrub for 'Tritium', and turn them ON if they aren't already. As for the scrubber we added to collect plasma, set that to scrub for 'Plasma' instead, but don't turn it on yet. We will turn the plasma scrubber on during the burn once the fire gets hot enough!
After your scrubbers are programed, go grab a Plasma canister from storage. Wrench it to the input connector and as soon as you see purple gas going into the mix chamber, activate the mix chamber igniter using the small button near the mix chamber Air Alarm (check the name of it first by examining it, you don't want to accidentally open the chamber vent blast doors). After a few moments the fire should become blue and you'll start creating Tritium, which will automatically be scrubbed into your pipe network up to the volume pump (LEAVE THE PUMP OFF FOR NOW). The freezer will work hard to cool it down while the scrubber keeps putting hot Tritium in the pipes.
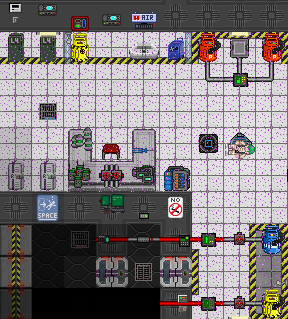
Now that the tritium is being created, what about the plasma we need? Go find the mix chamber console somewhere in the room. The console will give you the temperature of the chamber, pressure of the chamber, and list of all the gases in the chamber as well as their percentage. Watch this carefully until the temperature reaches about 15,000 kelvin. Once it does, go ahead and turn on the plasma scrubber from the Air Alarm we set up earlier. If you check your T2 canister you have wrenched inside the airlock, you should see that it's now being filled with pipping hot plasma. Watch it and let it siphon plasma until the canister reaches a pressure of over 3200kPa, then shut off the plasma scrubber.
Now back to the tritium. Take a second blue Portable Pump and wrench it to the Output of the heating chamber but KEEP THE VOLUME PUMP TURNED OFF. Keep analyzing the pipes with the Tritium in it. Soon, you should stop getting new Tritium (the 'mol' value will stop going up) and the temperature should approach our target 43.15. Anything below 45 is fine. Then, and only then, turn the Volume Pump on to put all the Tritium in the Portable Pump. Once the Portable Pump is filled and the output pipes are empty, unwrench the Portable Pump.
If you want to clean out the output pipes for future reuse, here's how. Turn the Volume Pump off and unwrench it, then re-wrench it. Doing so will make any leftover gases in the pump vanish and clean it, as it's impossible to completely empty it out normally. Turn the Freezer off and rebuild it entirely too to clear it's gas storage. If you have small trace amounts of Tritium in the pipes, don't worry about it too much. At super small mol counts it doesn't affect much at all.
That's it! If you did it right you got all the gases you need now, and the hard part is over. Now comes the fun part - actually building the bomb and blowing it up.
 Sealing the Deal - Putting Together a Research Bomb
If everything went right, you should have two Portable Pumps and a tier 2 canister. One pump filled with about 43.15 Kelvin Oxygen, one with about 43.15 Kelvin Tritium and a T2 canister with hot (~8000+ Kelvin) Plasma. Lets put this bad boy together.
Head to the Tank Storage Unit, grab a Plasma Tank and an Oxygen Tank, and load them into one of the white Portable Scrubbers and empty your tanks completely of Plasma and Oxygen, respectively. Put the empty blue tank in the Tritium Pump, set the target pressure to 850 kPa, set direction to In and turn on the pump. Ideally, tritium should make up about a third of your cold mix, adding tritium beyond this point actually decreases the power of your bomb. A cold mix composed fully out of tritium is barely stronger than a cold mix of only oxygen. Wait for the tank to fill, then turn off the pump. Take the tank you just filled to the Oxygen pump and fill it up until it's full by setting the direction to In and turning the pump on at 2533 kPa pressure. Take the other empty orange tank and fill it in its entirety with Plasma from the T2 canister.
Your gas tanks are now ready. Now you just need to put them together along with a signaler. Attach both tanks to a Tank Transfer Valve (they look like manual values). Pick up a signaler and change the signal code to whatever you want. Use a screwdriver on the signaler to change it to attachment mode and attach it to the Tank Transfer Valve. Head over to the launch site and place the TTV on the mass driver in the room to the right, shoot it to the bomb site and when it's there send the same signal code using your PDA or another signaler.
If you did everything right, the entire station should violently rock and a machine should inform you about your success, along with any experiments you completed and the 50,000 credits you earned! If you want, you can turn the Intercom next to the machine on before detonating your bomb to broadcast the test results on the common radio. That will (sometimes) stop the crew from asking what the hell just happened.
Watch this somewhat outdated video for a concise but out of date guide to toxins. The video isn't up to date with the latest /tg/ features such as the changes to Thermomachines and smart pipes.
 Principles
or, "How it Actually Works", or, "Read if You're a Nerd".
A TTV does not explode on its own: it only connects two tanks, and produces an explosion based on the same formula tanks themselves use for overpressure.
The explosion of a TTV depends entirely on how quickly the pressure rises in the tanks. By this principle, the most effective way to make a TTV is to have as much gas as possible in one tank, and as much energy as possible in the other. This is why we make oxygen/plasma bombs: in one tank, you get the enormous heat capacity of plasma combined with enormous heat - in the other, you try to fit as much oxygen as possible in the tank, and this is most effectively done via cooling. Since the gas needs to change in pressure very fast and very much, we use a gas with a low heat capacity (oxygen's is 10 times lower than plasma's). As a bonus, hot plasma and oxygen burn, which raises the pressure that extra bit.
Even though the max capacity for explosions can be safely hit with these bombs, the Tachyon-Doppler Array reads the blast size that the bomb would have, were there no maxcap at all. This is called the "theoretical" radius. For this reason, even if they don't explode any more violently, tritium based research bombs get a way higher score on the array.
The tritium is placed in the oxygen tank, as it has a heat capacity even smaller than oxygen's (half of it to be precise). It is kept at roughly a ratio of 66% oxygen to 33% tritium, which is the optimal ratio for it and hydrogen. Once the plasma feeds the energy into the cold tank, the violent tritium burn raises the pressure considerably, producing a much larger theoretical boom.
You might be asking: how far can we go with this? Well, if for some ungodly reason you're playing on a server with the maxcap disabled in the config (or, much more likely, if you disabled it yourself on a local build), you can make some pretty large bombs. The largest one has hot hyper-noblium in the hot tank (10 times larger heat capacity than plasma, the highest of all) and a very densely packed oxygenated tritium payload in the cold tank. Unfortunately, hyper-noblium stops all reactions such as combustion, but on very high temperatures the mole count should be negligible.
If you try this out, you will begin to understand why the maxcap exists. This is the true legacy of Cuban Pete.
 Implosion Compressor and Anomaly Refining
That funny-looking box in the toxins launch room does more than just sit around. It's the main way of getting anomaly cores.
What's an anomaly core?
Anomaly cores are essentially an item with the special property of being able to exist only in a very small number (currently eight) per type. They're used to give functionality to several high-end research items, and can be obtained in one of two ways:
- Defusing Anomalies with an analyzer and signaller, or with an Anomaly Neutralizer
- Buying raw cores from Cargo or using the random ones toxins spawns with, and activating them in the Implosion Compressor.
The machine will always require bombs with a blast radius of at least 4, which is tiny compared to the 50,000 point research bomb, and only requires a bomb just short of the one described in the next paragraph. However, with diminishing returns being a thing, this means that after processing multiple cores of the same type, the required blast radius will go up. You may need to slightly adjust your mix to be more powerful after each use of the Compressor.
The compressor will first take the raw core, then accept a TTV with two tanks attached. If the mixture of the two tanks would have provoked a blast that fulfills its requirements, the Implosion Compressor will rock the station with an equivalent effect of the actual blast, and the raw core will be spit out as a proper, activated core. You'll also get your TTV back, likely with one of the tanks gone. It's that easy!
 Guide to Maximum Capacity Bombing
So fate has decided to make you a bad guy and you've decided to use your newfound knowledge in the art of bombing to tear the station a new one. Great! If you've followed the above instructions at least once, however, you'll probably have realized that you only have enough gas mix to make a single bomb. There are, however, six Tank Transfer Valves in your table (and you can even get more from Cargo). Surely this is no coincidence? Indeed it isn't. A simple regular old Plasma-Oxygen bomb is very easy to set up and mass produce and, while awful and a waste of time in terms of gaining department budget credits, will be devastating if detonated strategically on the station! This part of the guide will assume you have some familiarity with working in Toxins and just highlight the bomb mix, as well as some general tips when bombing.
Your bomb mix: Put cold Oxygen in a portable pump, and hot Plasma in a tier 2 canister. Make sure to clean your piping in-between to avoid contamination. Set the Freezer you start with to 141.3 Kelvin and cool Oxygen to that temperature. Upgrade your Heater with Tier 4 Lasers and set it to 1413 Kelvin and heat Plasma to that temperature. Grab two tanks from the Tank Dispenser, scrub them clean, fill one to 2533kPa with Oxygen and the other to 3039kPa with hot Plasma. All done, you got yourself a maxcap! Pick a trigger, put it somewhere and detonate it. Below, you'll find the available triggers:
Шаблон:ItemSimple Шаблон:ItemSimple Шаблон:ItemSimple Шаблон:ItemSimple Шаблон:ItemSimple Шаблон:ItemSimple Шаблон:ItemSimple
Important Note about Remote Signaling Devices
Some jokers like to randomly signal the default frequencies of these devices so before you attach one to a bomb you'll want to open its control panel by using it in your hand and change the frequency and/or code so that you don't get a nasty surprise.
 Final Warning
Seriously, don't go and randomly set these off on the station if you aren't a syndicate or otherwise an antagonistic character, you WILL get job-banned or even permabanned.
If you manage to accidentally blow up toxins and maybe even the surrounding Research department once or twice as a beginner, don't panic and just explain what happened to the admins who will likely contact you. They're usually an understanding bunch and know that mistakes happen. Just make sure to learn from them!
On the other hand, if you DO know what you're doing, the potential damage you can cause to the station can be extreme and sometimes irreversible, very likely changing the course of the round. There are VERY few instances where you can use these bombs as a weapon while being a normal non-antagonist crew member, and even when faced with a situation where it could be used to save the station, use it only as a last resort.
Don't Be This Guy
We call this one a Toxins Moment.
Hey, at least you'll keep the Atmospheric Technicians busy for a bit.


